If you haven’t been over to The TomKat Studio, go now! It truly is “a place for all things pretty”!! The colors, the pictures, the decorations, tips and ideas are brilliant!
A few weeks ago, they spotted my Vintage Ruffle Cupcakes seen here that I had done for Cake Central magazine and asked if I’d share a tutorial with their readers! Of course!!!! I’ve been asked by various people how to make these pretty little things, so I decided, I’m just going to do a tutorial so the world will know! TomKat readers, here you go!
 Here is the finished product…a slight variation from my original version with the flat top and pearls. There are so many ways to make these flowers!! – get creative!
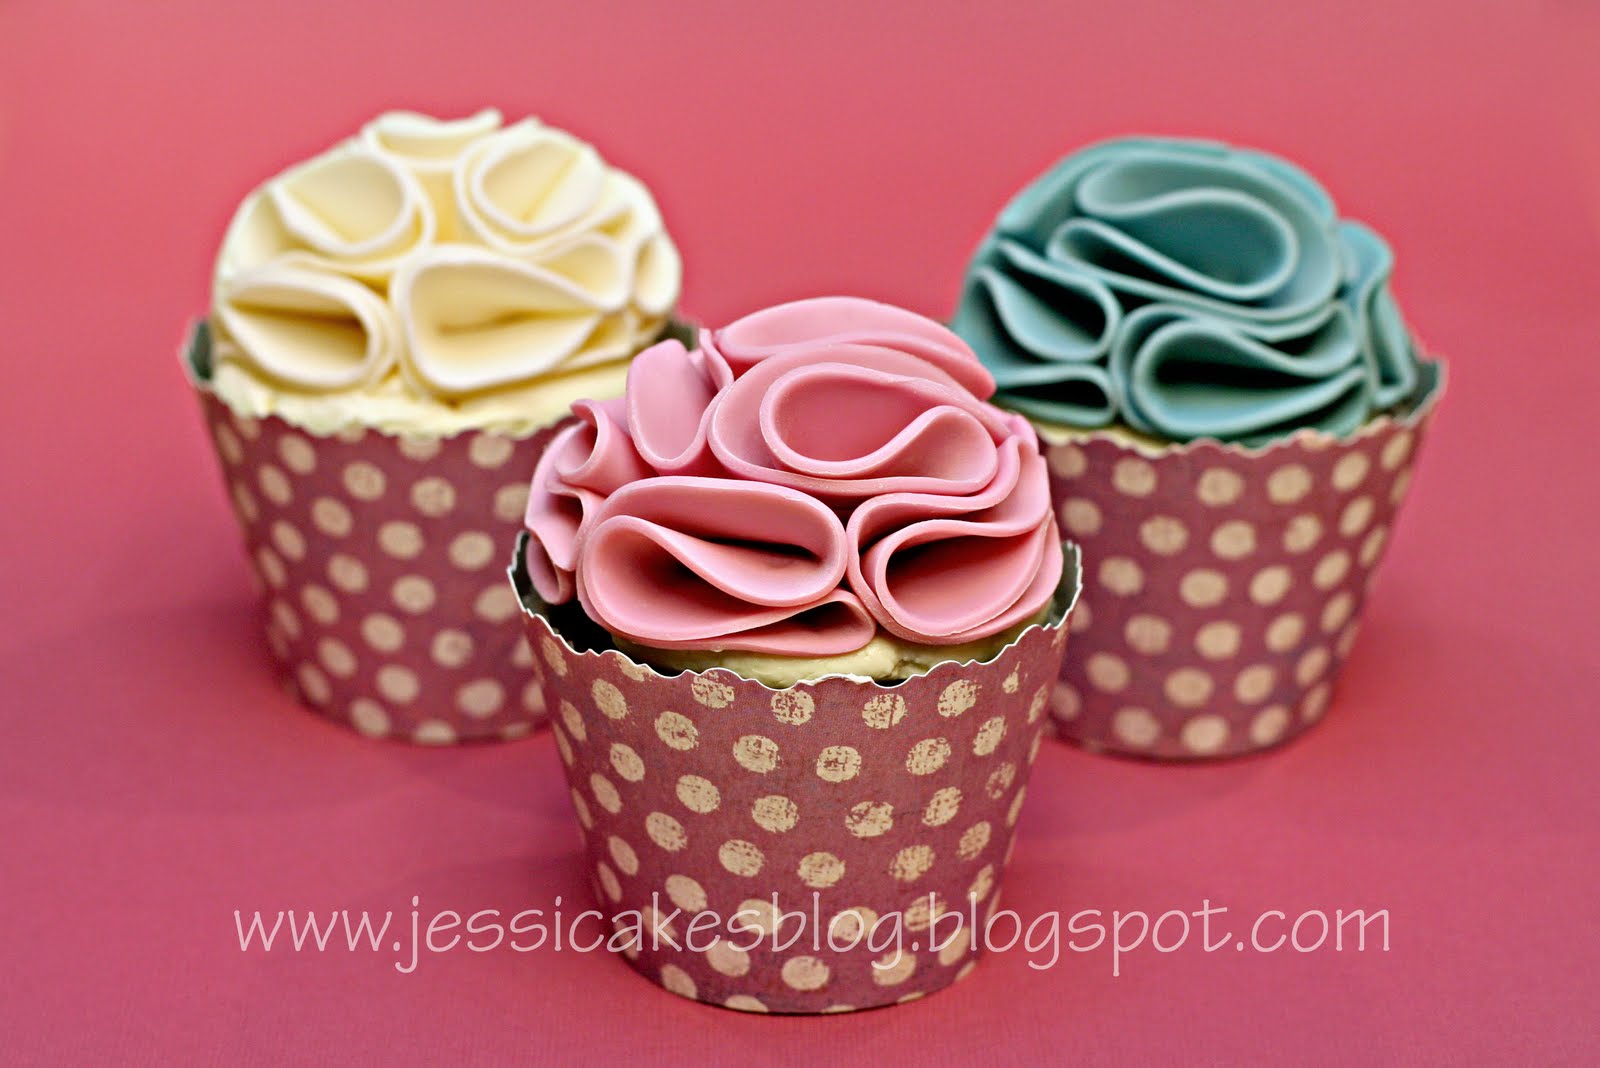
Here are a few steps that might be helpful!
 Measure out your cupcakes with a circle cutter. You want the circle cutter to be slightly smaller than the cupcake or cupcake holder. This will be the largest circle that you cut out. Now pull out the next two sizes smaller.
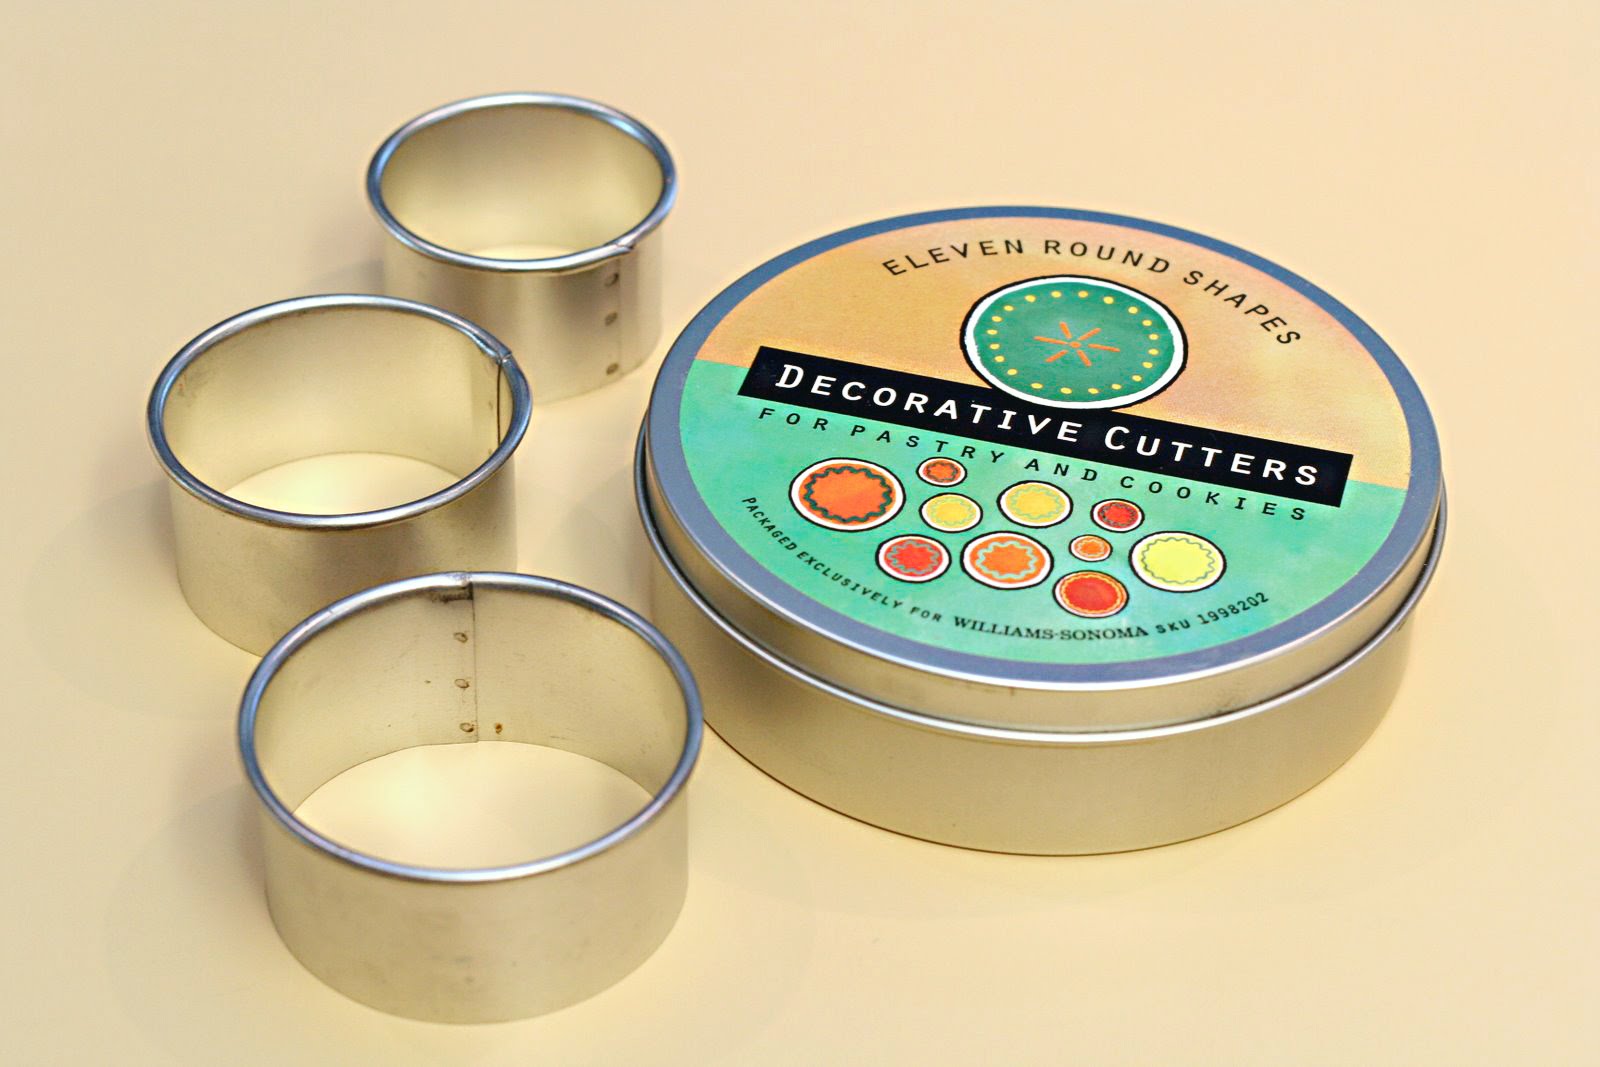 I use this set from Williams Sonoma. Works perfectly for this!
 I only use modeling chocolate to make these flowers…for four reasons. One, you can’t eat gum paste…who wants a big ol‘ gum paste flower on top of a cupcake when you can’t even eat it. Don’t tease me like that! Two, fondant on its own is too flimsy so that medium is out. Three, modeling chocolate tastes WAY better than fondant/gum paste. Fourth and finally, it works perfect for these flowers because it holds its shape but stays soft so you can fit the pieces together! So, roll out a piece of modeling chocolate as thin as possible. I use a little cornstarch under it to keep it from sticking. I have also used a little Crisco in the past, but the problem I had with that was when I started folding the circles to create each scallop, they would stick to themselves and not create nice open scallops/ruffles.
 If you need a recipe for modeling chocolate (candy clay) go here or here.
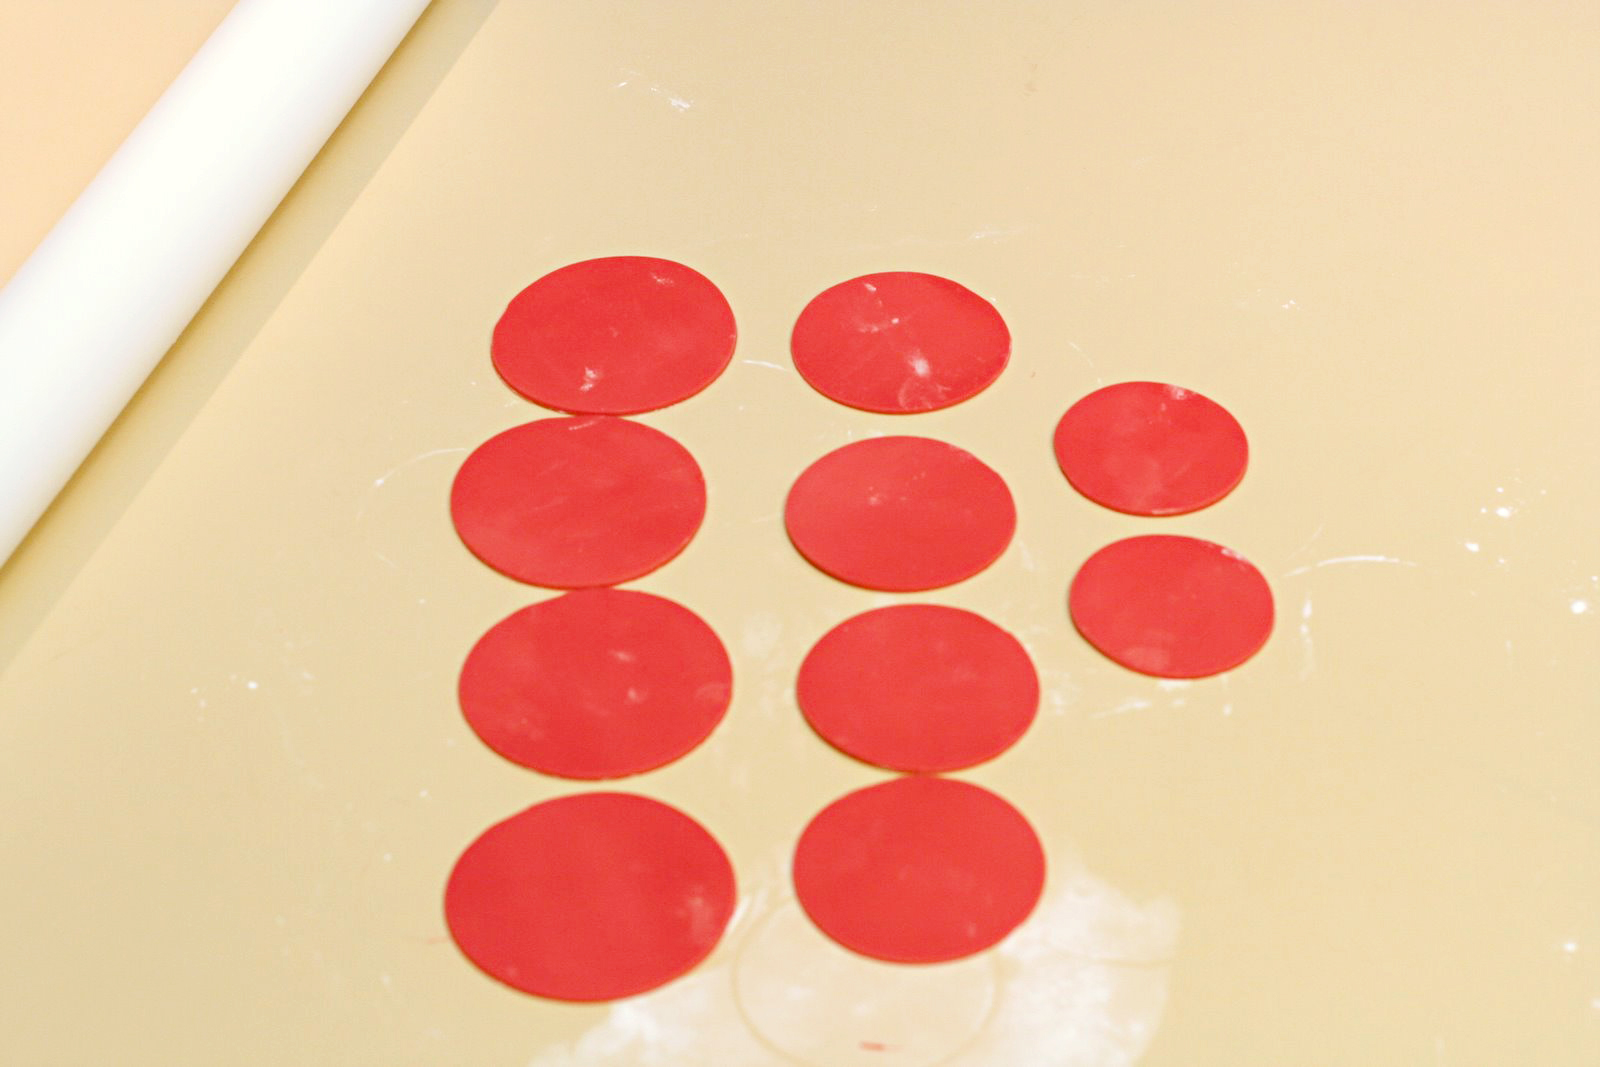 You’ll need four large circles, four medium circles and one small circle. Again, if you’re going for the smaller circle with pearls, then don’t fold/”scallop” the small circle…keep it for the top. I cut two little circles in the picture above because I was making the flower both ways (full scallop flower and a variation with the flower seen at the top with the pearls, so I needed two…sorry if that’s totally confusing! Now, let them sit on the counter for 5-10 minutes to firm up slightly before continuing on.
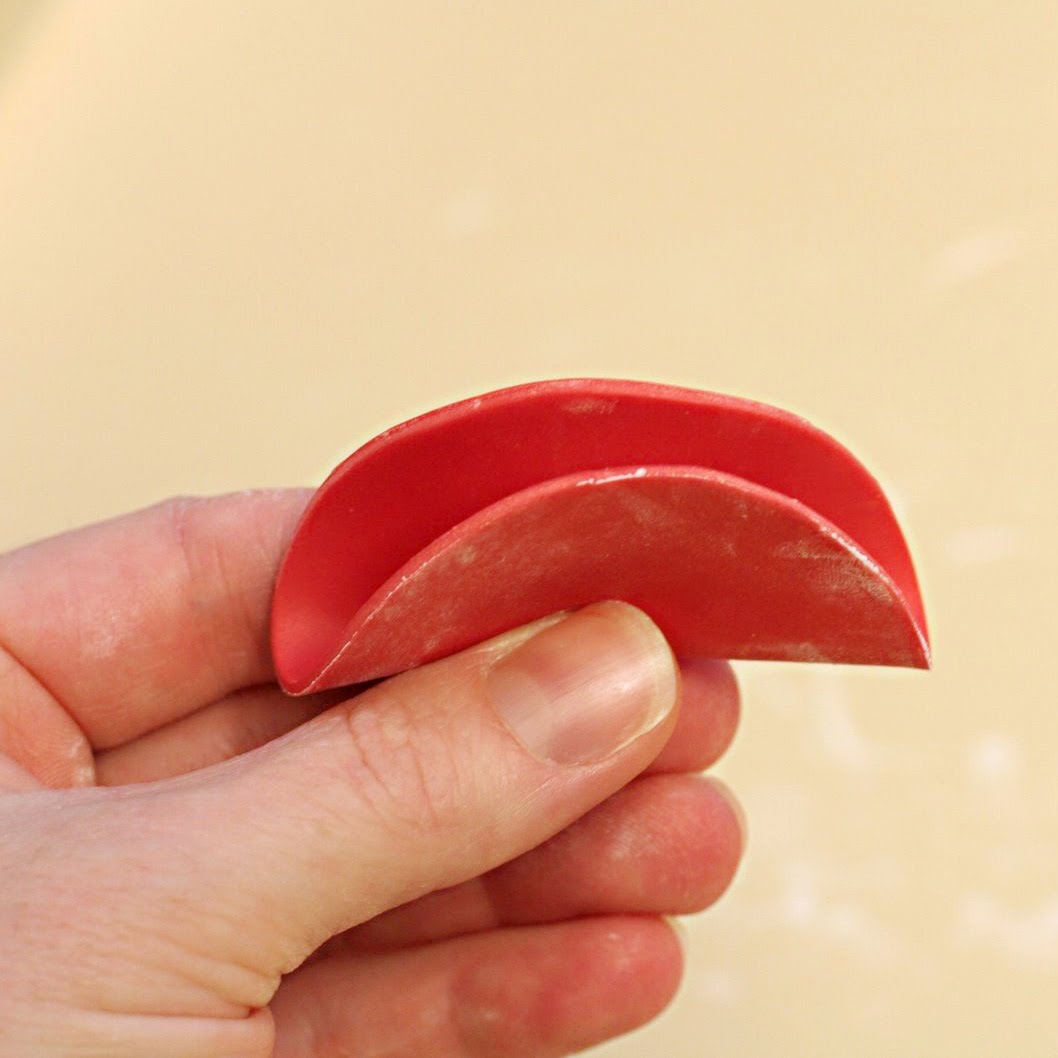 Start with the larger circles and fold each one in half (above)…and then half again (below) without pinching the edges together…just pinch the center together to hold it in place.
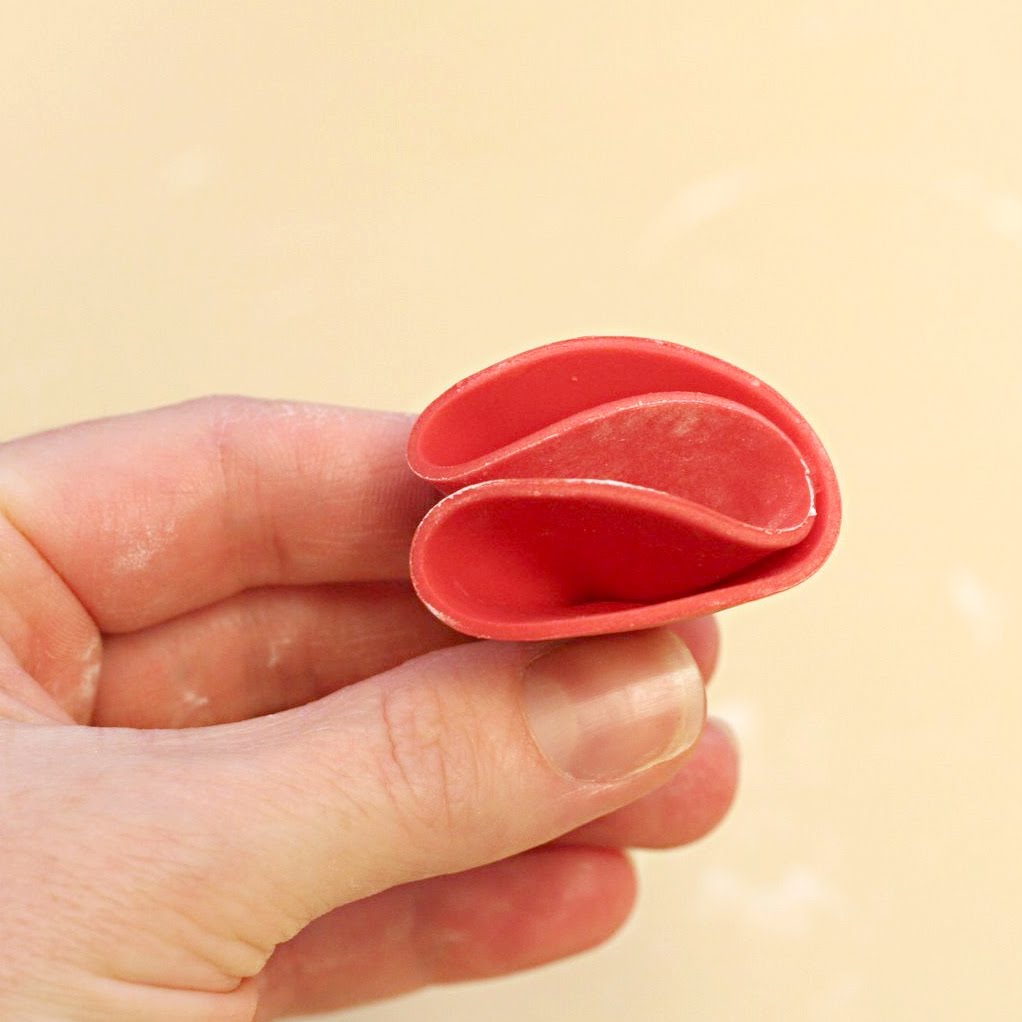 Now set them up to rest a bit and the chocolate will firm up so it’s easier to work with.
 Do you like my jell-o jelly bean mold? Works great for holding things!! Sorry for the red on red…if I would have thought about that ahead of time, maybe I would have made the flowers white so you can see them better! haha
 Once the chocolate has rested/firmed up a bit, add a dollop of matching chocolate (save a few of the chocolate pieces before you melt them for the modeling chocolate) to a sheet of wax paper and arrange the four larger scallops so they lay on the melted chocolate.
  I lay the scallops so the two larger folds fit snugly with the single fold from the next scallop. Does that make sense? – just look at the pic below and notice there is an order to how I arranged the four scallops.
 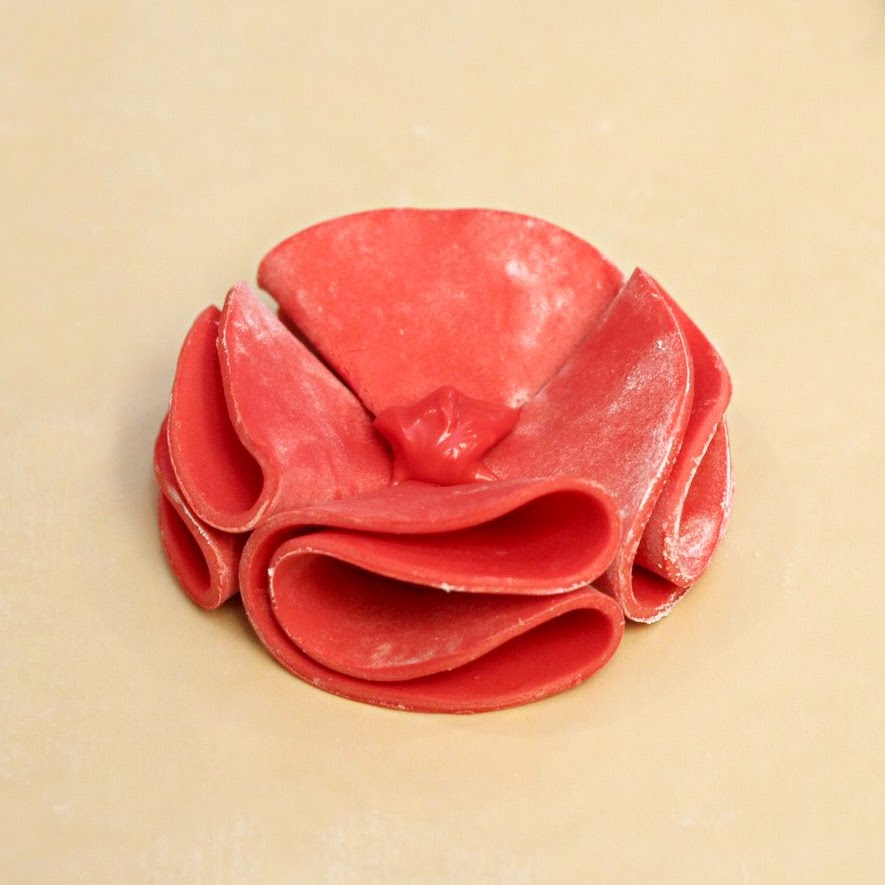 Now take the four medium circles and arrange them on top of the larger circles with a dollop of melted chocolate in the center. One of the scallops might have to be placed vertically. Then, take the smaller circle/scallop and place that at the top to create a full flower effect (below).
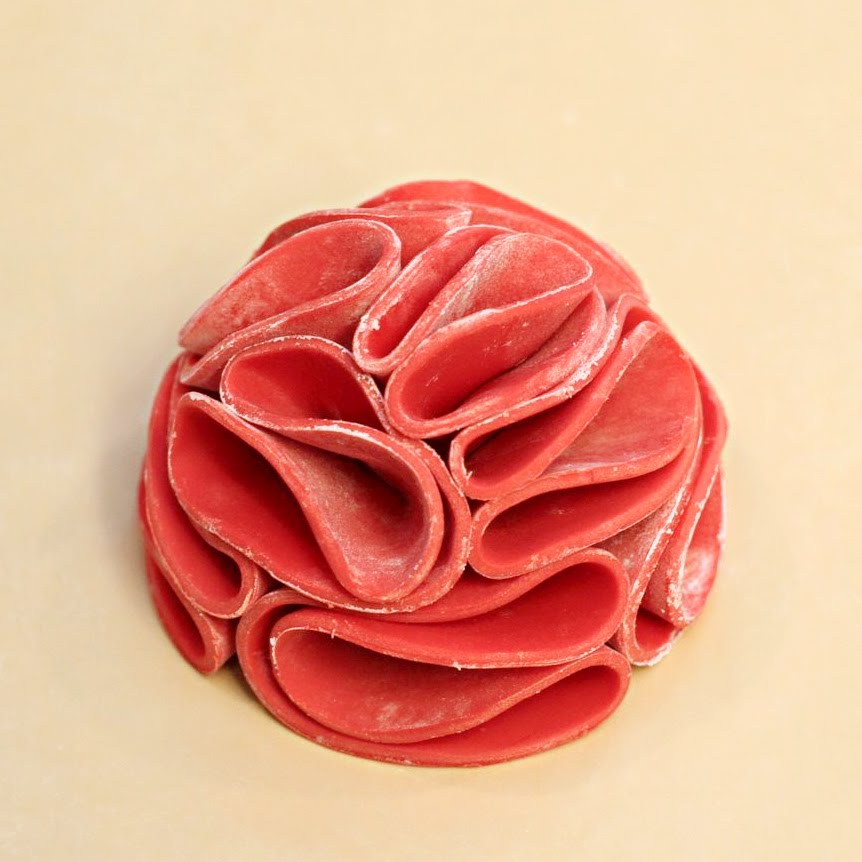
Now it’s time to clean all the cornstarch off to make it look even more pretty! I use a little vodka because it removes the cornstarch and the alcohol evaporates away so you’re left with a clean, dry, beautiful flower!

 Here you go! The full flower effect (above). Now, instead of adding that little scallop to the top, you can flatten out the scallops a bit and add the small circle to the top with some pearls (below) to finish it off. Pipe a big swirl of buttercream on top of your cupcake and place the flower right on top of the buttercream to keep it secure.
 End result! The flower is still a bit wet from the vodka, but when it’s dry it will have a nice satin look to it!
 I hope you all found the tutorial helpful!!
Thanks again to The TomKat Studio for featuring me and my ruffle flower on your amazing blog!!
Blessings!

 Here you go! The full flower effect (above). Now, instead of adding that little scallop to the top, you can flatten out the scallops a bit and add the small circle to the top with some pearls (below) to finish it off. Pipe a big swirl of buttercream on top of your cupcake and place the flower right on top of the buttercream to keep it secure.
  End result! The flower is still a bit wet from the vodka, but when it’s dry it will have a nice satin look to it!
  I hope you all found the tutorial helpful!!
 Thanks again to The TomKat Studio for featuring me and my ruffle flower on your amazing blog!!
Blessings!
What a fantastic tutorial! I love experimenting with different ways to decorate cupcakes and this will be super fun to try. Thanks for sharing
Brandi @ Tweedle Dee Designs
Very cool! Thanks for the vodka tip – I needed to know that in the past.
I’m not a cake or cupcake decorator, but this so makes me want to be. These are super cute!! I love your other cakes and such to the right. You are one creative lady!!
it is just fantastic!!! thanks for sharing
I paint cupcakes but have always wished i could decorate real ones. Absolutely beautiful!
Thank you so much for sharing this.
I just love it.
Gonna try it soon.
Beautiful!! Is there something other than vodka that I could use that would clean them off just as well?
Amanda: You can also use lemon extract
I love this! Not only is it just plain adorable however you look at it, you still get a lovely round top even when you cupcakes have fallen – which would be almost always for me. Thanks for sharing!
These are fantastic!!! Thanks for sharing!
Super cute!
Awesome! Thanks so much for sharing!
Those are really pretty, how clever!
Dear Jess:
I enjoy a lot your tutorial. I hope to make this beautiful flowers as good as you. Thank you for sharing.
From Tamaulipas, México.
Mary Tere
gorgeous!!
Wow these look fantastic!
I LOVE your blog, I’m so glad I found it, it’s a great example for me too as I’m just starting out in cake decorating too!
Do you have a fancy camera to take photos with?
Thats gorgeous!! I love it : )
Thanks for the awesome post, I’ve let my blog readers know you have this stunning tutorial just laoded.
wow this is amazing !!
so pretty~
Thanks for the lovely tutorial~
Very sweet – great tutorial – Thanks
can we replace the vodka with something else?
anyway..these were awesome!
Adorable! Great idea!
these look absolutely gorgeous, great tutorial loving the damask background for the photography
Fantastic and beautiful!
Jessica they look BEAUTIFUL!!!!!!!
You are a creative genius! So beautiful – thank you for sharing!
Anita
I have a question! Where can i purchase modeling chocolate or how can i make it!?
Fabulous work! That is one beautiful Cupcake!
Katie Herbold
OMG!! This is amazing!!!
I love this!! I’m actually going to try an inedible version out of felt or foam.
It´s wonderful!. A fantastic tuturial.
This is an amazing tuto! I Love it! Will you ever do cookies =)
SweetSugarBelle: I’ll leave cookies to you! – yours are amazing!
This is so cool! Thanks for the great tutorial!
Beautiful Idea!!!. http://dolcedots.blogspot.com
Beautiful, I am thrilled, where they can follow your blog
Hi, I used your cakes inspiration for my valentines party, http://kinderplays.blogspot.com/2011/02/valentines-ruffle-party.html
Junita: Beautiful party!! So fun!
That is so gorgeous! I might have to give it a try sometime.
hi Jessica, this is wonderful! I tried today, but every time I roll it and try to cut it crumbles and doesn’t hold… do you know how i could fix it?
“Come party with Me”: When using modeling chocolate, you need to kneed it a little while to make it nice and smooth like fondant. It will be nice and soft. Then roll it out/cut it like fondant. The only thing I can think of that’s happening is that you haven’t kneeded it for a while to get it nice and smooth and soft.
Good luck!
I love this! It’s so adorable! How long do you keep them in the jello mold? I tried making these but they just ended up collapsing and not holding their shape. Thanks!
Kim Swenson: Not long at all…maybe 15 minutes or so. Are you using modeling chocolate? If you’re using fondant/gumpaste it’ll take a lot longer to set up. Blessings!
You are just awesome!! Thanks for sharing!! LOVE IT!
This is amazing. Thank you so much for sharing
Jessica, thank you so much for sharing your work! It’s just amazing! Camila
wonderful!! kisses
these are beautiful! thanks for sharing how you made them, I will definitely be trying out modelling chocolate.
Amazing…!!!! XOXO
I love these!!! i tried making them this evening…. worked with the modeling chocolate for a while, it was moldable and soft… rolled it all out and cut the circles… i tried to fold them and they broke in half… i thought maaybe they were too hard… so i tried to fold right after i cut a circle and they still broke in half… any thoughts as to why?!?!
Anonymous: It sounds like your modeling chocolate wasn’t soft enough…had enough corn syrup in it. Next time you make it, try adding another ounce of corn syrup! Good luck!
Thank you SO much!! i will add some extra corn syrup!!!
thanks a lot I’m new to all of this and i’m going to use it for a special birthday party
Beautiful! What a creative idea! Thanks for the tip!!
Is there any way that I can substitute the alcohol to clean the flower? (allergic to alcohol) thank you.
(haiza_yusop@hotmail.com)
Anonymous: The alcohol does evaporate, so there won’t be any left. I’ve also heard of people using lemon extract, but again, there is alcohol in there. You could just lightly coat your fingers with crisco and rub that around on the circles prior to assembling to get rid of the cornstarch. Best wishes!
I found this tutorial through Pinterest – that flower is amazing! And the tutorial makes it look so easy, many thanks for this, I will definitely give a go!
Amazing work on everything!!! Thank you!
Hi Jess love your site. Thanks for all the helpful hints. I have a question about your SMBC. How do you transport your cakes since it doesnt crust? Your work is beautiful!
Anonymous: I cover all my cakes with fondant, so I don’t have to worry about that. The once/twice when I did the ruffle cakes with the SMBC as the finish, I put it in the fridge and got it nice and firm before transfecting so it wouldn’t leave a mark if accidentally touched!
Oh so beautiful! Just found your tutorial via Pinterest, and I’m in love! Which modelling chocolate brand did you use please? Thanks!
Sweetopia: I’m IN LOVE with your blog and have been for a long time! You inspire me to try cookies, but I’m too scared still! For some reason royal icing makes me nervous as I want things to be too perfect and I know there is a learning curve to cookies! So, I just drool over your blog and think, someday I’ll try that!
Regarding modeling chocolate…if you click on this link and scroll down a bit, there are several recipes under “what modeling chocolate do you use?”
http://jessicakesblog.blogspot.com/2011/05/most-commonly-asked-questions.html
Thanks for checking in on my blog! Glad you found me!
So pretty, I will try these out sometime :0)
loved these, i had to make them as soon as i see them, they went down a treat at my friends wedding, thankyou so much xx
Your cakes are incredible!
Thank you so much for sharing your gorgeous work.
Do you have any hint and tips on making those gorgeous, ‘ruffley’, ever so thin frills that are going around on ombre cakes these days??
I’d love to know!!!
xx
Thank you!
Yes…you just cut out thin strips of gumpaste or fondant mixed with tylose/gumtex powder and take a ball tool to the top edge to make it thin/ruffly. Then, start at the top of your cake and apply the rows of ruffles down to the bottom. Ruffle the stripes out as you apply them.
I hope that helps!
Jessica,
You are the most amazing cake decorator I’ve seen! And you are so kind and generous to share with us.
I made the ruffle flowers using candy melt by following your tutorials exactly. They turned out nicely! I’m thinking to post the picture on CakeCentral. Is that ok with you? I will mention a reference to your site.
Thanks!
Thank you!
Yes, go ahead an post them to Cake Central! I’d love for you to mention where they can find the tutorial!
Thanks!
Oh wow… this is very beautiful !! I have one question: what can I substitute for corn flour or corn syrup? Please help. I am planning to make cupcakes this weekend so exploring options. I would love to make this.
Yes you can use glucose in place of corn syrup. You’ll just want to add a few drops of water to it to thin it to a pourable consistency like syrup. Have fun!!
Thank you Jessica. What about for corn starch? Powdered sugar? I am just guessing here
Yes, if you don’t have corn starch, you can use powdered sugar. Blessings!
Thank you so much. You have been a true inspiration for my recent cakes. I have made a few of them in the last 2 weeks and my co-workers loved them ! I credited the designs to you and mentioned about your talent and creativity
i so much love this will try it waoh!
If I have to put these cupcakes in a bag, will the moisture from the frosting or cupcake make the modeling chocolate deflate?
No, not unless the inside of the bag gets over 105 degrees. Have fun!
Jessica – I tried this last night .. well though it may not be an “epic fail” it was fail nonetheless. my modeling chocolating cracked and it did not hold up like yours it was flat
help ..
Oh bummer!! Your modeling chocolate needs to be made correctly. If it’s cracking, it sounds like it needs more corn syrup. Try adding a bit more corn syrup and work it in, then let it rest a bit to cool down. Once you roll it out and cut out your circles, let them sit on your counter or 10 minutes or so, then fold them gently then let them rest/cool/firm up tipped up/open. Don’t lay them sideways until they firm up a little or they will try and collapse on themselves a little. I hope that helps! You can also use fondant and put a few little tissues in between the ruffles to keep them open until they dry a bit. Blessings!