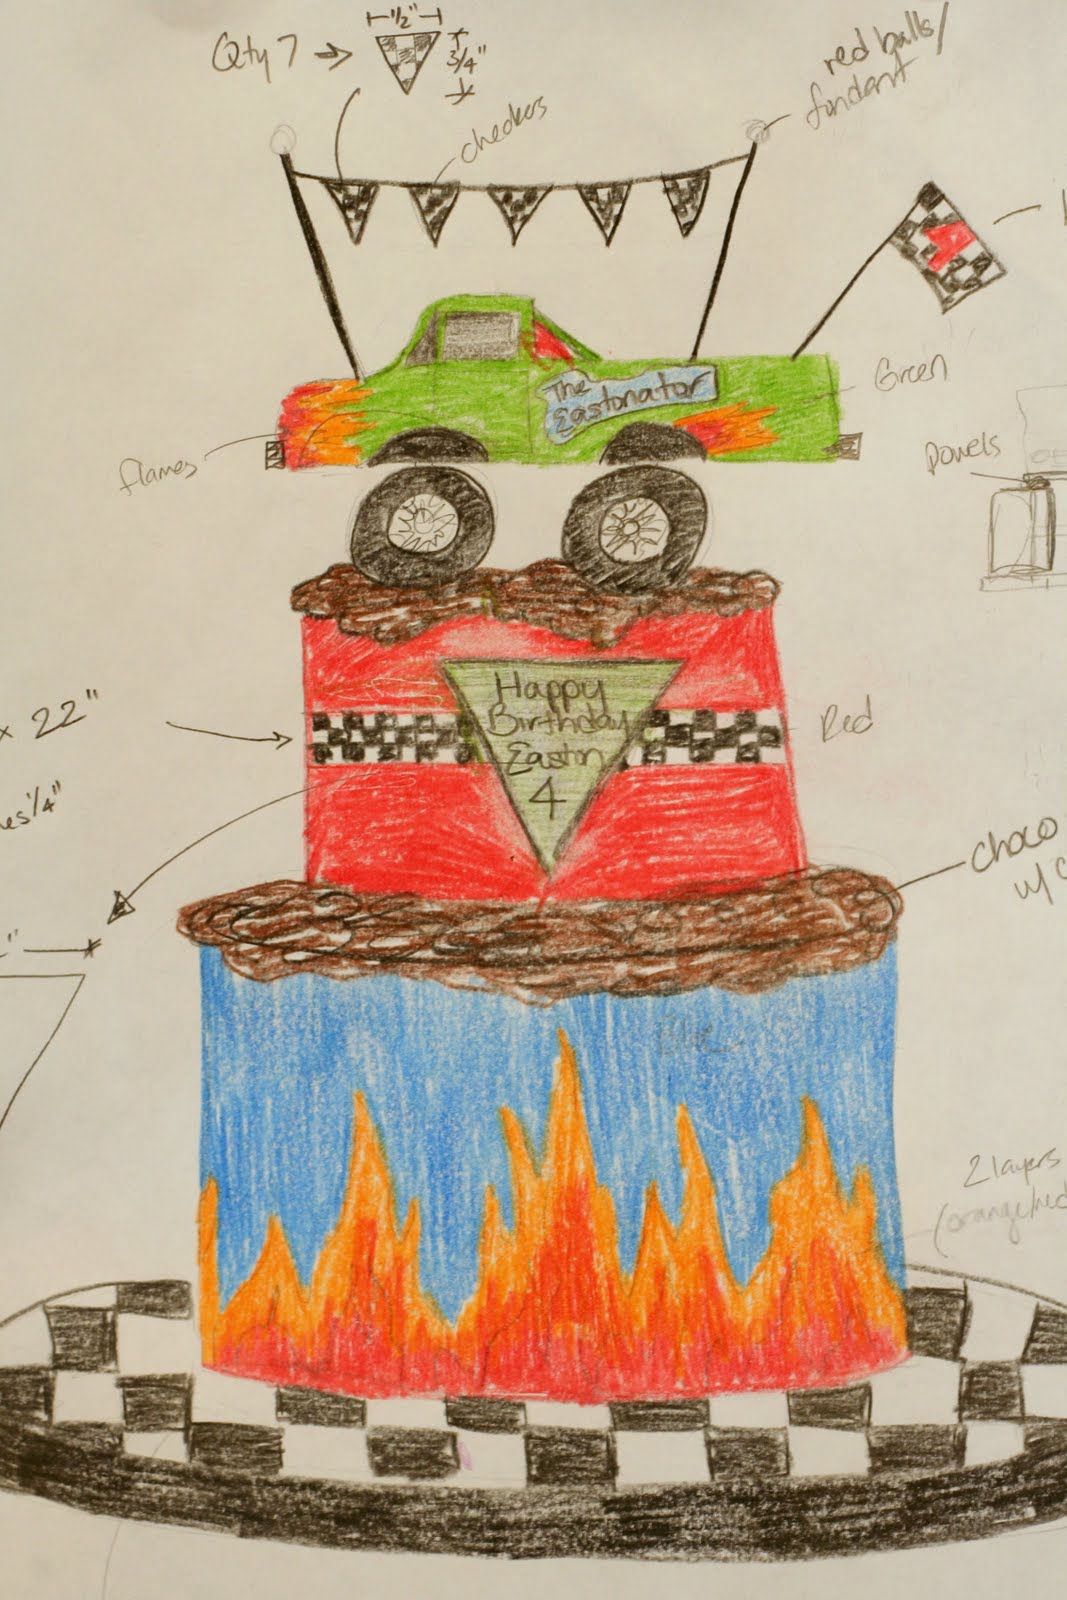
 Today, I tackled the tires and part of the truck. I’m going to do four different posts as I create this cake. My goal is for this first one to explain how to make the tires. The second one is how to create the truck, the third a video tutorial on how to frost a cake using the upside down frosting technique, and the last, the final result!So, today, this post will be about how to make tires…monster truck sized tires! I started out by making my rice krispy treats in a loaf pan and cupcake tins. The sizes would be perfect and I could jam the cereal treats into the containers to get them as packed as possible…and to not waste as much!
 I began by removing the RKT (Rice Krispy Treats) from the muffin tins and took one of my circle cutters that was the right size and cut off the angled part of the cupcake to give me nice flat edges for my tires.
  I then cut a cone out of the top side for the rim of the wheel. This will be the front of the tire.
Next, I found a diamond cutter that was a little bigger than the width of my tire (see below). I was going to create treads using this cutter. You don’t need to own a diamond cutter. You can just cut strips from fondant or modeling chocolate and proceed to the next step.
 I then cut out overlapping diamond shapes from some modeling chocolate I had. The color doesn’t matter because you’ll be hiding the treads with black fondant. I only overlapped four cuts because otherwise, the treads would have gotten too small to fit around the width of the tire.
 Place your treads on. It took 10 treads per tire…and I eyeballed the placement.
 Flip over the tire and place a black piece of fondant on the back. You can use the same circle cutter you used earlier for this.
 Next, flip the tire back over, and lay a piece of fondant over the front and sides. Smooth it down and cut it off so the two black pieces of fondant seam together. I flipped the tire upside down to make sure they joined well and sealed the RKT in. Then, use a modeling took or even your pinkie finger and begin pressing in between all the treads to accentuate the design.
 Voila! A tire! Something I found a bit helpful is at this point roll the tire along the counter top with slight pressure onto the counter. It flattens out the tread a bit and makes it more like a tire…less rounded. Almost done…now for the rims.
 Place a small gray ball into the center of the tire.
 Using the ball tool, press down and smooth it out like the picture below.
 Now for the sparkle…silver luster dust. And the details came from a few icing tips. I just pressed them into the silver fondant to create some patterns. Again, I don’t really know what I’m doing…but this worked great and gave me a nice look. Plus…my son won’t care!

 And, here you go…four monster truck tires…ready for their ride! Stay tuned!
Fantastic! I love it, thanks for sharing this tutorial.
I LOVE this tutorial, very easy to understand, great photos…THANK YOU!
Can’t wait for parts 2-4!!
Great tutorial thank you!
OMG you are my hero, love your cakes. Hope you are really making a book.
Cómo me gustan tus trabajos, cuidas tantísimo todos los detalles, es increible lo bonito que te queda.
Besitos.
Wow! You are so good in making these!
laboratory freezers
Thank you for sharing!!
You………….are………..a………..genius!!!!!!!!!!!!!!!!!!!!!!!!!!!!!!!!!!
How do you made the Rice Krispy Treats? Thanks for sharing
Alexandereen: I just used the recipe from the Rice Crispy box. Pretty simple! If you need a finer texture, try crunching up the crispies before mixing them with the marshmallows. That helps to make them less bumpy!
Adorable! How early in advance can you make these without the rice crispy part going stale? Thanks!
Anonymous: Thanks!
I have no idea…I would assume a few days if kept wrapped up in a plastic bag.
I learn SO much from you, thank you for sharing, love this!
How in the world do you come up with these ideas? :). Praise God for such talent…thanks for all the tips.
Like you said, “Praise God!” – truly they are from Him! – He gave me my brain!
thanks for sharing this tutorial Loved it
Lovely…..
http://zariafrozrecipes.blogspot.com/
Your cakes are absolutely amazing! truly works of art! awesome! all of them, cant pick out one..im just trying to figure out a way to be able to follow your blog, and ill do it once im done. Thanks for sharing such gorgeous tutorials, love them!
You’re a Godsend. I have all your classes on Craftsy and those are my absolute fav. Also, please please share your RKT recipe with me : )
Thank you!
For these tires, I used the traditional Kellog’s recipe found on their website for Rice Crispy Treats. In my third Craftsy class, my new recipe is in the class materials. It’s much more stable than the traditional recipe and will hold up in so many various situations and is wonderful for sculpting. So, if you do own the Birthday Cakes Class, look in the class materials. Blessings!
Hahah really? I hadn’t had a chance to watch that one yet. I Jz buy a lot of classes when they’re on sale lol. Thank you thank you!!! Watching it right now and love your gelatin idea you’re so clever : )
What is the gelatin idea? I’m curious. I’m in the middle of making my first jeep cake
This is awesome!! I thank you so much for sharing! I really did not want to do donuts as everyone else suggested. Truly wonderful idea. You have no idea how much im so grateful for you sharing this!!
Superb tutorial thanks so much
Going to be making my first monster truck in October and had no idea of how to go about it….What I have just seen here, is a genius at work…..Thank you for such a detailed way of doing this…those tires look amazing!!
Yay!! I wish you all the best!!