 Hi everyone! Whew…this week was CRAZY!!!!!!!!! I first off have to apologize for the lack of pictures I’m going to show you! I had planned on taking a lot of pics, step by step, to show you all the entire process of making the truck. But time slipped away this week! I had two interior design jobs happening at the same time this week, a 4-year old birthday party to plan and a cake to make. So, as I was finishing the truck and cake at midnight on Wednesday, my goal was to get into bed…not to take tons of pics. But, hopefully with these pics and my “lessons learned” (because there were quite a few on my first vehicle) you’ll know exactly how to make your own Monster Truck!
Next, I took a picture of his little truck, scanned it into my computer, printed it and cut it out to get a template to use. I can’t just carve something on my own…I need a template or something to copy…just like my baseball hat cake. I placed the picture up against the rice krispy treats and began carving until the shape was right.
 Now, at this point, looking back, I missed a step! – Lessons learned #1: Put a board under the cereal treats before carving. The problem I had was after I had carved it, and glued it to the board, it was taller and a little out of scale because of the increased height from the board. So, do that first…then carve!
Then, I used the same truck picture and cut out the fender sides of the truck to use as a template for the modeling chocolate. I cut those out and attached them after I crumb coated the truck with melted chocolate.
 I also covered the window section with gray fondant so that when I cut the windows out of the red modeling chocolate, there would be gray under there…to look like windows.
 Again, use a model of something to help you carve/size the object you’re building out of edible materials. It makes it soo much easier than trying to come up with something from the top of your head. I know there are brilliant artists that can do that…but I’m NOT one of them!
  Here is where I forgot to take more progress pics. I only have the end result…
  So, I’ll explain what I did next…and the lessons learned! :)After I crumb coated the caved truck with melted chocolate, I covered it in red modeling chocolate and smoothed all the details with my fingers to bring out the fenders and create dimension in the bed part of the truck. However, before I covered the truck in modeling chocolate, I SHOULD have covered the bottom and wheel wells with black fondant. I ended up doing that after I did the red because I had forgot that you’ll see the bottom because the truck sits so high above the tires! If you look at the pic above, you can see the black fondant because it lays on top of the red…If I would have done it first, then I could have cut the red modeling chocolate around the base of the truck and you wouldn’t see the black base. So, BEFORE covering the cake in the modeling chocolate, turn it over and cover the bottom and wheel wells…it’ll look much cleaner!
Then, I used my son’s actual truck to measure out the bumpers, lights, windows, etc. Now, for the windows…I didn’t like how “clean” the cut was and decided to paint the windows black. I could see some of the red modeling chocolate left on the gray and I could see small cuts in the gray from the exacto knife. So, I got out my black gel color and vodka and painted in the windows…it looked much better!
Then, I attached it to the cake! To do that, I measured how high off the cake the truck would sit…so, I measured the height of the tires and then the distance I wanted it sitting above the tires. For this truck, I wanted to to float above the cake by 3″. So, I inserted my bubble straws into the top tier of the cake so that they stood above the cake by 3″. I covered the straws in black fondant, slathered the tops with melted chocolate and placed the truck on top. I then used some melted chocolate on the backs of the tires and placed each tire against the bubble straws. Again, sorry for not having a great progress pic, but you can see how I it looked when all was said and done!
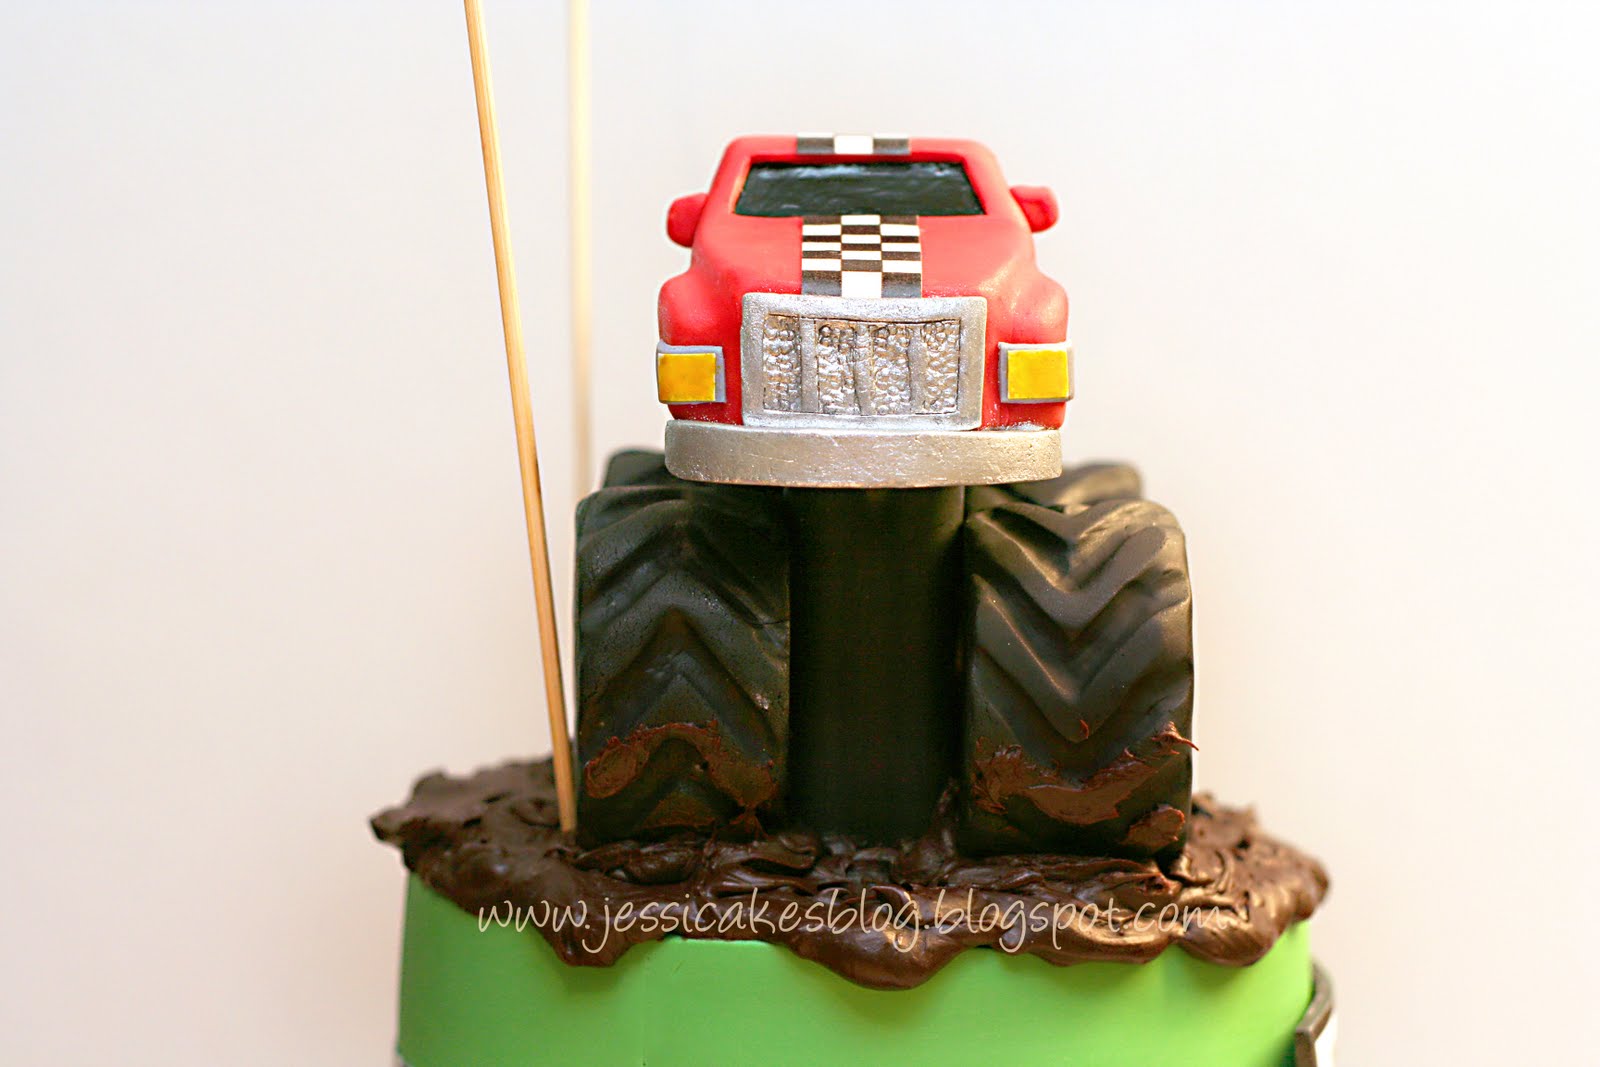 Because my truck was so narrow, the straws ended up right next to each other. So I covered them in one piece of fondant.
And, that’s it! Again, so sorry for not having progress pictures towards the end! For my first truck, I’m pleased, although I know next time it’ll be much cleaner!
Thanks for looking!
Just used your tutorial for the truck and it turned out great! Thank you so much for help
What do you mean by Bubble Straws?
http://www.amazon.com/40-Bubble-Tea-Straws-Rehabilitation/dp/B000AN47XS/ref=sr_1_1?ie=UTF8&qid=1324426646&sr=8-1
They are just really wide/fat straws. Perfect for supporting tiers because the cake goes into the center of the straws and doesn’t get pushed out/displaced like dowels when you put them into a cake.
I’m trying a tractor and was wondering how you covered the treats with melted chocolate?
thanks so much for posting this! I was stuck on a project until I saw this and how you did the fenders. You are awesome!
Can rice krispy treats covered in fondant be made in advance? How would you store them?
Yes they can be made a week ahead of time or so and covered in fondant. Then stored in a sealed container or wrapped and frozen for up to a month. I wish you the best!