 I have a sweet friend…her name is Summer. She is a little ray of sunshine like her name! – and she’s my cake buddy. We’ve only made cakes together a couple of times, but we spend LOTS of time sharing ideas, tips, techniques, dreams and future plans together. She is SO incredibly smart in all things baking and writes the “Bakeology” articles for Cake Central magazine!! Her user name on Cake Central is Summerki…so you can see her work! She’s got some serious talent! If you haven’t checked her articles out, you should…you’ll see how smart she is – and you’ll learn something new I promise!!
  Another thing about my sweet friend is that they throw THE BEST birthday parties!! They do costumes, decorate the entire house, make tons of treats, goody bags, set out the entire dessert table, etc etc etc!! – it’s incredible!! Her family gets on board and helps sew things, decorate things, etc etc etc! – you get the idea…it’s amazing! – Truly amazing! The theme for Maddie’s party was “Maddie’s Fashion Fairytale”. The whole house was decorated like a run way fashion cat walk and called “Stone House of Fashion”. There was a literal run way, mannequins dressed to the hilt, Paris icons, ribbon wrapped columns, paper topiaries and flag banners everywhere…it was beautiful! Summer’s mother-in-law made all the girls their own little t-shirt dress to model on the catwalk. It was SUPER cute! Here’s my girl with her “serious model face” taking a stroll! She was crack’n me up!!! It took her a bit to warm up to “modeling”, but once she put her serious face on and got a few people saying, “Wow, she’s good!” I couldn’t get her to get off the cat walk! It was hilarious!
  The other thing Summer designed was the cake. I take NO credit for this sweet cake except actually making it! So it was a team effort! She sent me a sketch and I drew it up in my Autocad program…here is the drawing.
  I also created the template for the bottom tier using photo paper. That worked really well because it didn’t stick! A new idea I had that I will be using again. Instead of card stock, use photo paper to make templates.


 I ended up making that bow about 6 times! I was trying to make it like Planet Cake where it sits up instead of laying flat! I just could NOT get it to sit right and had to keep remaking it. Finally I gave up and just laid it flat. What I didn’t realize would happen is the batting I was using to fluff up the bow ended up leaving tons of marks behind when I took the batting out of the bow. So, I ended up making a new one and taking it back to the party to replace the other one! Yes, I’m weird…WAY to driven to perfection!! Oh well…it DID look better! – and that’s what counts! Here’s the final version!

Now, onto techniques and how to’s!! There were definitely a few learning experiences with this cake (isn’t there always) because there were several new things I hadn’t done before!
The first thing that was new for me was the quilting effect on the top tier. It’s a common technique, but I just had never done it! I tried just using my 60/30 triangle from my drafting days but it didn’t work because it was straight plastic and wouldn’t curve to the cake. So, I went looking for my card stock to make a template and realized I was out! AH! – What to do!??? Then it hit me…photo paper! It has that nice glossy side that doesn’t stick and it was the perfect height – 6″! So, I used that for both the quilting guide and the template for the bottom tier. I love how “bad” things that happen can turn out for good! God is so gracious!!
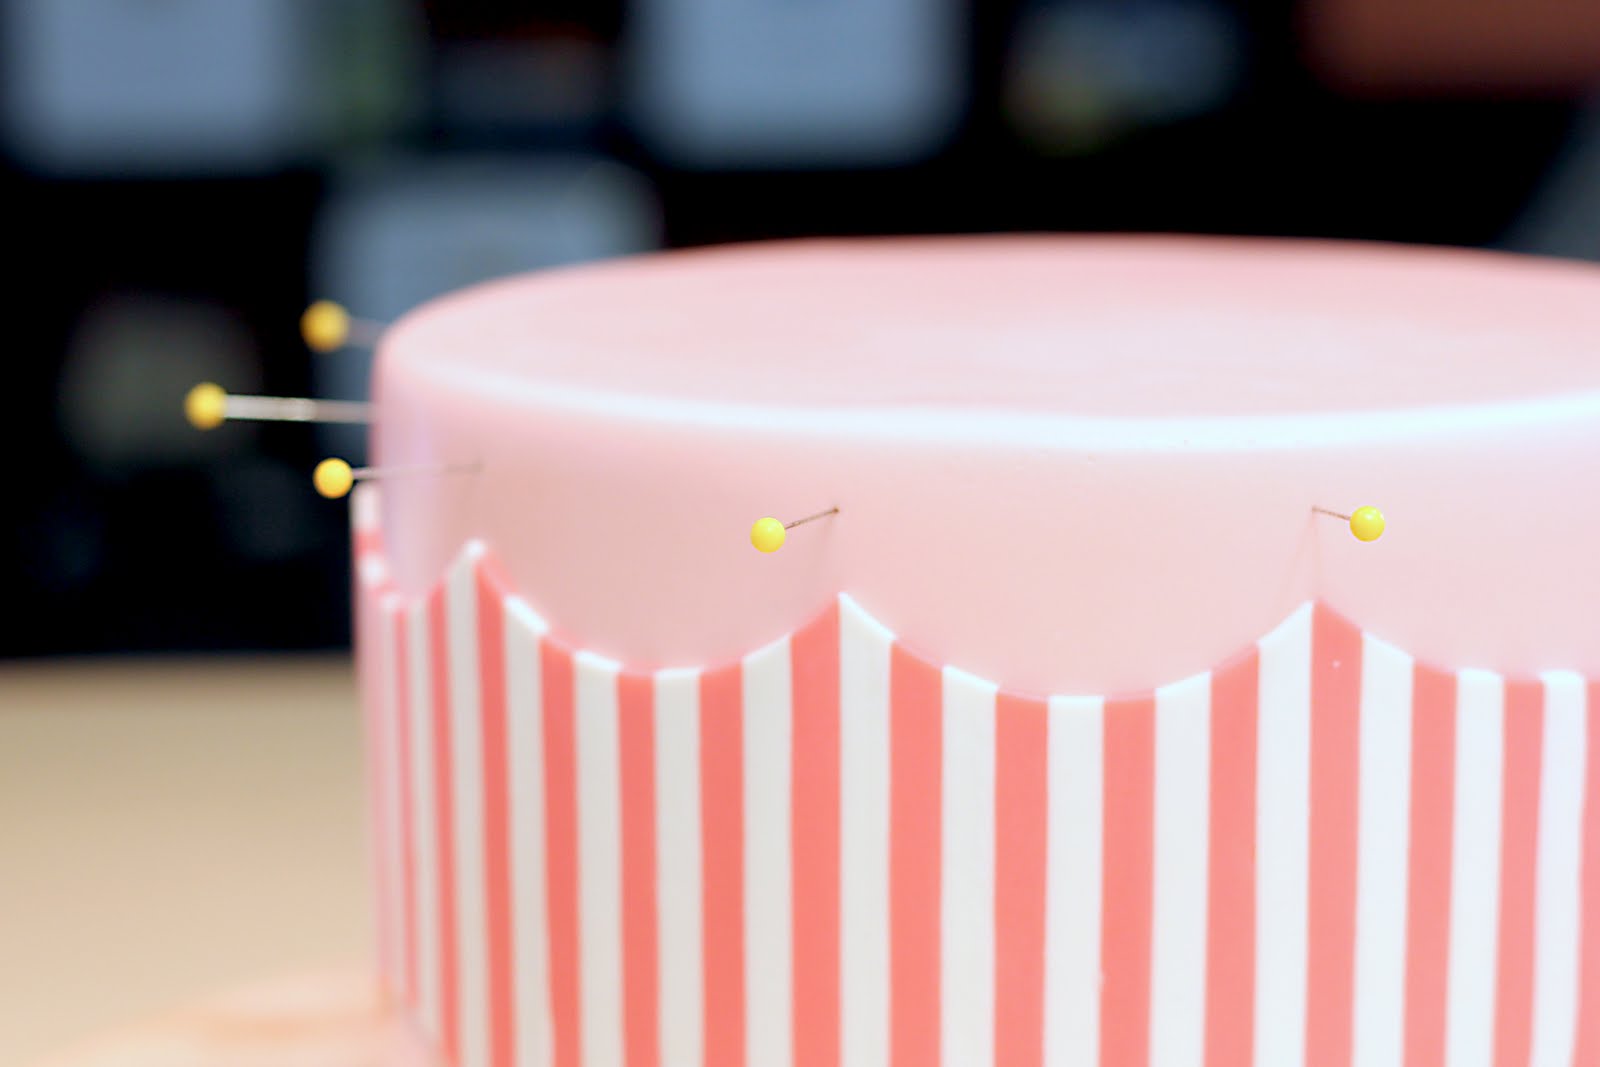
 I also measured down on the angled part of the photo paper the width of each of my stripes and cut into the photo paper with an exacto knife. This way when I laid the paper up onto the cake and pressed on it slightly, that little cut in the photo paper left a tiny mark on the cake to guide me for the next line. It worked perfectly! I then used the Wilton quilting tool (seen here) to make the impressions along the photo paper. The black balls are little black edible sprinkle beads you can buy at Micheal’s.
OH, one other thing I forgot to mention is the pink fondant I used!! – HUGE new learning lesson! Pink gel colors fade!! I colored the fondant pink (see this first picture above with the pins in it), and by the time it got to the party and set out for a bit, it faded to a peachy-pink (see the pic below). It faded a good 3-4 shades of pink and what was left was much less pink and more fleshy in color…it was really weird!! Summer said she had that happen to her too and was shocked!! I guess if you don’t want the pink to fade, you have to air brush it! – but I don’t have an airbrush machine! So, if you know of another way to keep pink gel colored fondant from fading (besides working with it in the dark or keeping it in a box), write me a comment…I’d LOVE to know! – for future!

W.o.n.d.e.r.f.u.l!!!
Beautiful cake!
Chefmaster brand makes a No-Fade pink (and purple) gel coloring…I’ve never tried them, so I don’t know how well they work, but it’s worth a try.
You are amazing! Stunning cake. I love the tutorial. Every post you do you teach me something new! Thank you!
Henson08: Thanks sooo much! I’ll definitely try that next time I’m making pink fondant. I’ll let you know how it works when that happens! Blessings!
Gorgeous cake!! Thanks for the “how to’s”! I was wondering how you did the bottom layer. You make it look so easy! Is it just pink that fades? I’m making a cake this weekend using blue fondant. I want to color it ahead of time, but I didn’t know if it’d fade or get darker while it sat before I put it on the cake.
Lydia: I’ve made lots of different blues and never had any of those fade. I’ve heard that when in the sun, anything that has the pink/purple color in it can fade slightly…also the black has been known to fade/dull in the sunlight. But, you’ll be fine with the blue!
Yet again another great cake. I’m sure Maddie and Summer loved it.
I have had pinks and purples fade but from my understanding if you mix it let it sit and fade and then re mix it it’ll be great.
Your cake is amazing. All your cakes are amazing. Thanks so much for sharing all your tips and tricks. I can’t wait to make another cake and try some of them out.
Gorgeous cake and display! What an adorable birthday party!
Wow, this post was very informative. I really learned a lot, thank you for sharing! I especially like your stripe technique.
About the fading, part of it has to do with the fact that some fondants have a whitening agent in them which causes some colours to fade. Reds are very unstable. The combination of the two makes it worse. That’s also why purples tend to turn blue. SugarFlair makes a good Violet that doesn’t really fade. As for pink, I think you just have to make it darker, but there might be another solution.
This is really gorgeous! Thanks so much for the great how-to info as well. (And it’s so nice to read explanations from another perfectionist. Just makes one feel at home.) Peace.
What a beautiful party! And a nice tutorial as well! I lvoe making PC bows, so if you ever need a hint or tip I’m glad to help!
You are amazing! Is it possible publish in my blog? Thank you
Patita: Sure! Just link back here so they can get the “how to”! Thanks so much!
Absolutely stunning cake!! Love the tutorial
Hi Jess! I just discovered your blog and am nuts about your techniques. Thank you so much for your generosity in sharing them.
What kind of fondant did you use to cover the tiers? Its so perfect!
Angeliaaki: I used Pettinice/Bakels on this cake. It was my first time using it and I liked it. It was very airy feeling and reminded me of my marshmallow fondant.
Hey Jessica. I’ve had the pleasure of using fondarific and it is AMAZING!!!!!! No elephant skin like satin ice and soooo forgiving! Pls sample it if you can.
p.s.
It takes a while harden so if making pieces that need to harden be sure to allow much more time.
it would be so helpful if you did a tutorial on how you used the AutoCad software to create this amazing cake! thanks!
I have a random question: Do you know where they found the black/silver dress form that is sitting on the cake table next to the M? I absolutely love it!
Part-Time Bakeaholic: I have one just like it! – I bought mine at Bed Bath and Beyond! Also, look at Home Goods or TJ Maxx.
3 of my favorite stores! Thank You!
Powder colors don’t seem to fade for me.
Another super incredible and generous tutorial. God bless you, thank you for teaching me
I sooo love this cake!!!! …. You are great at improvising and using some homemade “tools” as here in Ecuador we can´t get everything we need so easily
Gaby: Thanks! I think everyone would be surprised to see how little cake stuff I have! I try to use what random stuff I have around my kitchen and use my imagination as much as I can! Blessings to Ecuador!
totally in awe of your cakes, hope you dont mind me asking but what autocad program are you using? many thanks awsome cakes!!!
Suzy: It’s just the basic Autocad Lt program. I use that to draw, then import it into Photoshop to color it in. Thanks for your sweet words of encouragement!
Thanks for the horizontal stripes secret tutorial. I tried it on a cake I made this week and it looks great! I will be featuring it on my blog, and linking to you of course. Keep teaching and inspiring!
beautiful cake< wich pans you used and for how many people?
Your cakes are amazing! You are a jem for sharing you cake knowledge, Thanks!
nead in white molding chcolate and it wont fade. the no fade gel colors do not fade but give you diffrent shades than the regular get colors
GREAT BLOG… I rarely leave comments but I had to. Thank you very much!
Hi Jessica!
I’ve spent a better part of today reading your blog. I LOVE LOVE LOVE your work! It’s gorgeous, flawless and inspiring! I’ll be trying the upside down icing technique for a cake that I’m making for the christening of a friend’s daughter this weekend. I will definitely be trying the modeling chocolate in the near future.
I have two questions; when do you color the modeling chocolate? (melting/mixing cake or kneading) I have wilton melts, but would love to try with white chocolate as well. And second question, how long are the strands that you get using the extruder gun? I couldn’t see ay seams in your strands, so I’m very curious…
Thanks for sharing your lovely work!
Elizabeth
Elizabeth: Thank you for sending such encouraging words!
I rarely color my modeling chocolate. I use the Wilton melts and try to design with those colors in mind. If I do lighten them I just use white modeling chocolate and mix that in. Or, I’ll combine a little colored fondant to it. If I do need to color it a deeper hue than the melts allow, you can use chocolate/candy gel colors. I would mix it in after I melt the chocolate, before you add the corn syrup. Or, you can add it a little at a time after you’ve made your modeling chocolate like you color fondant. It just totally depends on what color you want! How’s that for a clear answer!
I extrude the ropes as long as I can. There was two or three seams in the cake above. I just keep extruding, let it sit up a bit, then put it on the cake. Also you can’t extrude modeling chocolate very easily…you need to use fondant that you’ve added lots of Crisco to so it’s the consistency of gum. Then it goes through the extruder nice and smoothly!
Blessings!
Thank you so much for the tutorial on this cake! You made it much easier for me to attempt a similar design! You are the best!!
Thanks so much for sharing. I will be trying the wax paper technique next time
Really nice cake i want that for my birthday.
Do you put a light coating of Crisco on the modeling chocolate when you’re ready to place it on the cake? Is that the “glue” that you use to get it to stick to the fondant when you’re placing it onto the sides of the cake. I’ve started working with modeling chocolate, and I’m not sure what edible “glue” I should use with it. Corn syrup? Crisco? Thank you!
I just use a little water or a 50/50 water/corn syrup blend if I’m concerned about it. If it’s anything bigger than flat decorations, I use melted chocolate.
Hello Jessica,
THANK YOU for your blog, flawless cakes, and inspiration! It’s my new find of 2012 for sure and I’ll continue trying to be just like you!
Little recipe for edible glue:
Piece of fondant or gum paste with a bit of water.
Leave it to dissolve in a small sealed container.
Works for everything! Love it!
Thanks again!
-Véronique from Québec Canada
WOW, you’re so sweet and generous with your words!
LOVE that little recipe! Thanks for sending it over!
i love you designs. may the lord continue to give you such beautiful ideas.
Wow…your cakes are amazing. It’s very inspiring to see you using the gift that God has given you. I am def going to try out some of your ideas. Thanks for the inspiration Jessica. God bless.
I saw this cake some time ago, and thought is was so beautiful. I just love it. Thank you for showing us how to do it. You are so generous with your talent.
I saw this party on Pinterest awhile back, and fell absolutely in love with it!! Every single detail is beautiful. I just came across your blog tonight on youtube. You are fabulous! And so generous sharing your knowledge with everyone. Thank you so much!! I have been decorating cakes the last 2 1/2 years and still struggle with some of the process. I definitely plan on giving your techniques a try. Again, thanks for sharing your wonderful gift!
~Karen
This is gorgeous jessica! You have the gift, and thanks for blessing so many people through your gift! I’m a newbie, mother of 3 and just started caking for a year now. I have so much to learn. I would like to know what kind of photo card template do u use for the bottom tier? How do u get even waves throughout the cake? Do you overlay your cake with the pale pink fondant then add the stripes or you put the stripes first then add the pink waves? Thanks again for your kind heart
Hi there!
I actually just put the instructions back up…so, see above post and let me know if you have any other questions on it. I figured it’d be good to have one small example of my wax paper transfer technique in case people need it before my video comes out!
Blessings!
Jessica
Beautiful!
Thank you very much for your tutorial. You have an extraordinary talent for details (I love details!). I am sure I would use your tips a lot! Thanks again!! Silvia
Your cakes are phenomenal! Can you use the same stripe technique with fondant?
Yes! – because the wax paper helps to hold your design!
I really love your cake, i was wondering how you got that gorgeous m on the cake was it a cutter you used?
Thank you!
I printed off a font I liked and cut it out, then used it as a template to cut out the “m”. I don’t remember what font it was! Sorry!
I really love your cake,and wanted to make it for my baby sis b-day!!! I was wondering what size the cakes are??? And how many layers are there
Yeah!
They are 5 six inch layers and 5 eight inch layers.
Best wishes!
Thanks Jessica, With the 5 layers of cake how many inches tall is each tier? Thanks
They are around 5″ tall. Each layer is around 3/4″ thick, with a good 1/4″ thick coating of buttercream. Blessings!
THANK YOU for posting! I love all the excellent details.. So many things I’ve had to learn the hard way — so glad you’re saving so many decorators the headache! My experience w fading: I use the aforementioned “no-fade/ribbon pink” and “no-fade/ regal purple” (bought at http://www.cakedeco.com). To get brighter colors I use that then add other pinks/violets in. For redder reds I use a ton of NFpink and some Super Red. For blacker blacks I use dark modeling choc and Super Black. For modeling choc, which doesn’t take color well, I add a little fondant which “grabs” color better. Thx again!! Laurie@sweetcelebrations.us
Any chance of adding a pin it key? This tutorial is so great and I’m sure it would be posted all over Pinterest.
Hi Jessica thanks so much for posting. I was looking for a 16th birthday cake inspiration when I stumble across your blog. I recreate this cake for my niece’s party and it was admired by all. The only difficulty I’ve experienced is making the rope and the black borders. I have in mind to use buttercream instead of fondant as I don’t want to make a huge amount of black fondant (which is difficult to color). My rope didn’t look as good as yours and I ended up using white fondant (as pearls) for the borders to cover the edge of the cakes
Make chocolate buttercream and then tint black. Takes way less dye.
First I want to tell you that I admire your work, you are very talent and helpful to me with your teaching techniques. Now I want to share a problem that I have whit a cake, when I bake a cake that should be baked in a 10″ pan but if I divided the batter in smoller pan like 6″ and 4″ to make a cake of more than one level, when it comes out of the oven the cake feels soft, I like this, but when the cake must be cut it falls apart and it breaks. What I should do?
Sorry you’re having trouble with your recipe. I would suggest trying other recipes out because I haven’t had troubles like that. For now I would suggest chilling or semi-freezing your cake before you cut/torte it and stack it. Chilling it makes it more stable. I wish you the best!!
Hi Jessica! Your cakes are so beautiful and thank you so much for sharing your secrets!! That is so kind of you to take the time to do that! I would love to know how you cut your photo paper for the quilting template to get the angle you used? And how far apart did you space your diagonal lines? Have you done it with different angles as well? Thank you again!
Thank you!!
I don’t remember how I got the exact angle…I might have used one of my architectural triangles. But, you could just copy the graphic picture of the cake above and use that for the angle if you want!! I measured them to be 1″ apart on the photo paper. I haven’t done it with other angels, but you totally can!! Blessings!!!
Jessica I love your blogs and Craftsy courses! Thank you so much for showing that you can make beautiful cakes without all the fancy/expensive tools. I tried to use your wax paper transfer method to to apply vertical molding chocolate stripes to a cake but could not get them to stick together as beautifully as yours do on this cake. The cake must have settled a little and the lines developed gaps between them. How did you get yours to stay so crisp and flush with each other and the cake? Did you mix your molding chocolate with fondant? Roll the stripes together to smoosh the sides together? Any tips you have are appreciated. Thanks!
Hi there!
I just filmed another class where I show how to do something similar to this! I just press them to each other with a little right triangle as I lay a few out. Then, adding the sugar syrup to the backs helps them to all line up and stay. Before I add the sugar syrup, I do take a fondant smoother to them and make sure they are all the same height and nice and smooth. Make sure to use a pasta machine or a roller with some bands so that all the colors are exactly the same height!! I wish you the best!!
I love the quilting tutorial and can’t wait to try it for my daughter’s cake. Do you think it would work with buttercream instead of fondant?
Thank you!
I’m not sure…I haven’t done it with buttercream. If you try it, make sure to chill your buttercream so it’s nice and firm before attempting. I wish you the best!
Hello Jessica, I’ve been asked to make this cake and before doing anything I wanted to check with you if you don’t mind… I bought all of your craftsy classes and I must say I really have learnt a lot ! Thanks for everything and keep up the wonderful work ! Karla
Thanks for checking in! Yes, as long as you’re just using it for clients you can use this design. I just ask if you post it somewhere that you reference back to this post and the original creator. Blessings to you!! So happy you’ve enjoyed the classes!! xo
so pretty! I was wondering how you kept the pearls on the cake? thanks!
Thanks!
I use a little sugar water (50/50 mix of corn syrup and water) and they stick right on with a gentle push into the fresh fondant. Don’t use too much when working with the black pearls because the color can come off onto the pink fondant! Blessings!
Beautiful cake! Did you use your bow template (enlarged) for the bow? Or a different technique? Thank you:)
Thank you!yes, I used the traditional way of making a bow where you make each side separately then use a center strip to hold them together. Blessings!
very awesome blog thanks for sharing. I enjoyed reading your blog.
I know this post has been up for awhile but I wanted to let you know that if you knead a little baking soda in the fondant it will help with the fading. I was using the Wilton “rose pink” which is really hot pink to me for the first time and didn’t realize how much it would fade. My hot pick turned into a pastel pink very quickly. I remember seeing a post somewhere on Pinterest about using baking soda to keep purple fondant from fading. Works great! Haven’t had a problem since I started doing that.
That’s fantastic!!! Thank you!!
Did you use anything as glue to attach the modeling chocolate stripes to the fondant cake?
I just use a little sugar water…it’s 50/50 water and light corn syrup. Blessings!
How much do you charge for that cake?
I don’t. I’m sorry! It was a gift to a friend. Best wishes!
Hi I hope you can answer my question it s a lovely cake with a superb instructions. I want to do a strip cake but wider strips in gold and silver if I keep them on a wax paper with shortening will my gold paint get smudged do you have a solution please.
Hi there!! Sorry for the delayed response, but the greased wax paper will actually hold the luster dust totally intact! You can paint them and put them upside down on the wax paper and they will transfer beautifully. You’ll want to wipe excess shortening off with a soft wipe/tissue. Then, after a few hours, you can dry dust them a bit to add a little extra sparkle, but the luster will be set! Try it on a little sample. It’s amazing!
Where did you purchase the Pettinice?