My sweet little guy turned 5 this weekend!! It’s crazy he’s 5…time has FLOWN by! He is SUCH a sweet heart and loves his mama so much…it makes me feel so blessed!

He’s still really really into all things trucks and all things construction. I think every cake I’ve made for him for the past 3 years has had some car theme to it. Last year was the monster truck cake, so this year it was all about construction! We had hard hats for the kids, Home Depot aprons, and bug house projects for them to work on during the party. We strung up construction tape everywhere like it was streamers…it looked like a demolition site all around my house!! It was a fantastic day!!!

The whole idea of the cake began when I was visiting a sweet friend of mine who has a dedicated room FILLED with all things cake decorating!! Not only is her place full of the coolest stuff, but she is one of the most sweetest and generous people I know! She LOVES to share and bless others…it’s an amazing gift of hers. She let me look all around for some fun vehicle and construction molds to use on my cake…and I found lots of fun stuff! The bulldozer, digger, roller and dump truck used on this cake were made with chocolate molds. I’d never done any mold work before so it was a new adventure for me. I definitely learned a bit that I’ll share with you towards the end…a little tutorial of sorts is at the bottom of this post.

There is very little time in my life right now for creating/decorating cakes…so, I decided to use some paper decorations on the cake to give it a fun feel, but not take a ton of time to create them in fondant. All the little signs around the cake are images I found online, printed on card stock, and glued to thick toothpicks. They worked great! – and saved me a ton of time!! And, something I didn’t realize would happen is most of the boys wanted to take some of them home with them…so, they became little take home gifts too!


The main cake (with all the decorations on it) was a half sheet pan of mudcake that I cut into four rectangles and stacked together. The bottom cake (that is covered in oreo cookie crumbs) was a half sheet pan of vanilla cake cut into two pieces…creating a larger rectangle the main cake sat on. I carved down the edges of the base cake a bit so they weren’t squared and more rounded like a cliff. The cookie crumbs worked great but made SUCH a mess!! I felt like everything in my kitchen was covered in cookie crumbs! :) I spread some chocolate buttercream all around the base cake to help the cookie crumbs stick. I had to put the orange ribbon around the board to keep the cookie crumbs from going all over every time I moved the cake around!! :) I then stacked the main/decorated cake on top of it and added a little more buttercream and cookie crumbs to make it look like piles of dirt were in front of the trucks. The mess was worth it…it was a fun (and yummy) part of the cake!!

The cone was all rice crispy treats, crumb coated in buttercream and covered in orange modeling chocolate. I formed the cone by hand until it was just the right shape, then let it set up in the fridge before covering it in buttercream.
A little lesson learned on this one:
I had the cone in the fridge to let the buttercream set up before covering it in modeling chocolate. The problem with doing that was as soon as I began covering the chilled cone in chocolate, the modeling chocolate wouldn’t budge! – it started to harden real fast so that the seam in the back looked terrible. (See picture below) I couldn’t get it to melt together like I’m usually able to do and the more I worked on it, the more buttercream wanted to squirt out! So, I hid it by sticking the cake up against a wall! LOL! Next time, I’ll crumb coat the rice crispy treats in melted chocolate so I can cover it at room temp…it will make it much cleaner! Good thing my little guy could care less about seams! :) It all tasted good to him!
Ugh…isn’t that seam UGLY! – see…I’m not perfect! I just usually hide it better than that! :) Instead, I’m actually showing you this picture…instead of pretending “everything went perfect!”

I crumb coated the cake in buttercream…something I haven’t done for a long time. I usually always use ganachebecause it’s so stable and I can cover a cake at room temp…giving me a lot more time to smooth it and make the edges sharp. But, again, this cake was for my son and I didn’t have a lot of time to make a batch of ganache to crumb coat the cake with when I had plenty of buttercream left over.

Now, when you cover a cake that’s been chilled with fondant, you have to work fast so the buttercream doesn’t soften under it, so that the fondant doesn’t become tacky from the cold cake, and so you can still get your sharp corners. Well, I realized why I switched to ganache!!! Working with a buttercream crumb coated cake is much trickier! I have been rolling my fondant pretty thin lately because it gives me sharper edges. When you put thin fondant on a chilled cake, you have minutes to smooth it down before it starts to get cold and tacky…which at that point you have to back away from the cake or you’ll ruin it! So, the fondant job isn’t great…good thing I had LOTS of decorations! :) From here on out, it’ll be ganache from now on! Once you go ganache, it’s ridiculous to do anything else! :) Lesson learned!
And here is my sweet boy with a few of his buddies!! He’s the third from the left…the seriously cute one! :) HAHA…I’m partial…but all moms should be right?!

Blowing out the candles. The cone was perfect to put one of the candles in…although he couldn’t blow them all out together. Oh well! – it looked cool while they were all lit!

I love you little guy! Thanks for being an amazing son! May the Lord bless you and keep you, may His face shine upon you and give you peace!
How to add different colors to your chocolate molds:
Here’s the one I used. You can find it here on Amazon.
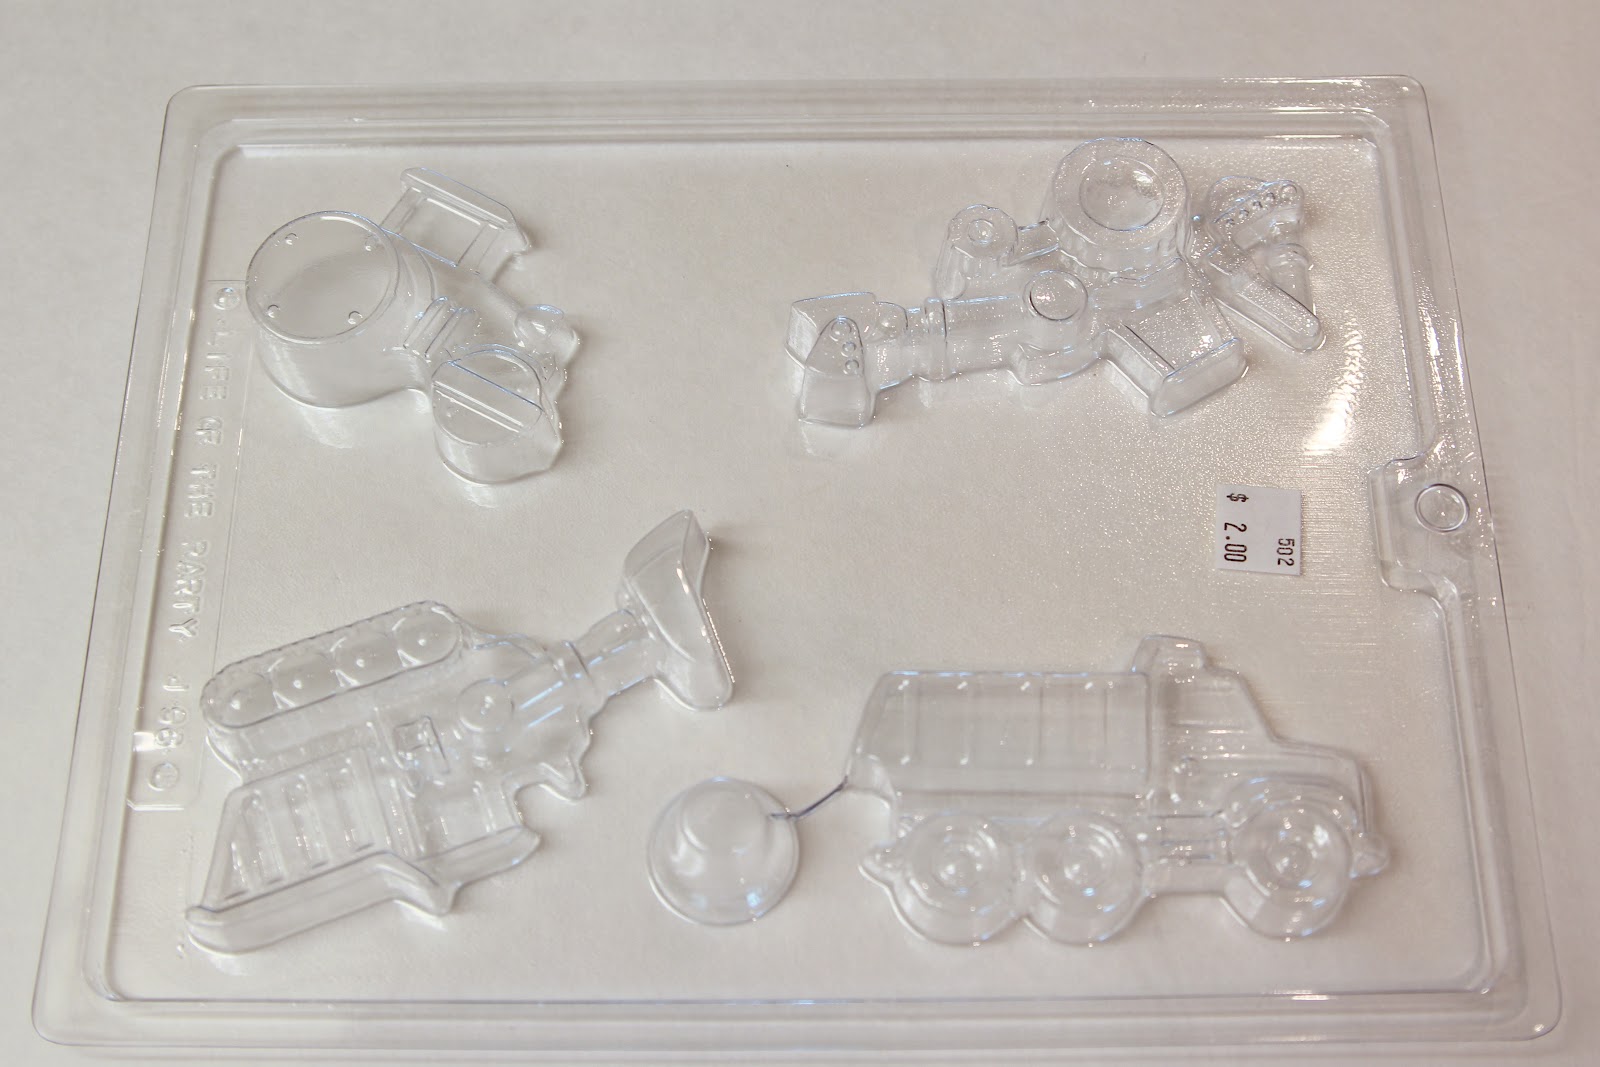
I used Wilton candy melts for these molds. I was told to spray them with some non-stick spray then wipe them out before putting my chocolate in them. I actually didn’t do that on the one pictured below (because I hadn’t heard that yet), but did spray the rest of them. I preferred the one that I didn’t put the spray in because I found that I couldn’t wipe all the spray out of the tiny details and some of my chocolate ended up running together because the oil got in there and made it hard to get a crisp line. They popped out of the mold just fine…with or without the spray. So, just an FYI on that. I would do a test one to check if they pop out without the spray if you try it.

I melted some black, yellow and orange Wilton melts into three different bowls. I added just a touch of Crisco to make them a bit smoother. I then began painting the areas I wanted the color…yes, painting…with a regular brush! :) I poured a bit of black into the wheels and started painting up the sides. I went over it a few times so it was nice and coated. I tried to keep my lines really thick/clean but it’s hard to get it perfect. After the black, I put it in the fridge to harden, then used the orange and painted in the dump truck and some of the buckets. Once that hardened in the fridge, I poured in the yellow to finish it all. One thing that happened when I poured in the yellow was the warm yellow chocolate melted some of the thinner areas of black/orange chocolate (like the windows) and the borders became a bit vague…not sharp like I had painted them. So, next time, I’ll let the yellow (or main chocolate color) cool as much as possible to where I can still pour it, but so that it won’t bleed/melt into my other colors. FYI for future!
It was very fun and SUPER easy to make the molds. It definitely saved me some time…and for a busy mommy, right now, I’m ALL about saving time! Thanks again Deborah for letting me raid your cake supply and find such fun stuff to play with! :) Hugs to you!
I hope you all gained something here you can try on your next construction cake!!
Blessings to you all!
Okay that is seriously a fantastic cake, love it all
When you mention buttercream on this construction cake are you talking about a Crisco/powdered sugar type buttercream or a swiss buttercream? I’m getting ready to make my first fondant cake this week and I love reading your notes about your successes and trials.
Joy: I use Swiss-Meringue buttercream. Good luck to you on your first cake!!
Beautiful work!!! I think it’s not only funny but very useful that you share pics and your experience w the cake’s mishaps… (Not that people would’ve noticed). I’m very far from making cakes that are anywhere near perfect, but I’m trying new techniques and learning as I go. I tried the upside down icing for the first time last weekend and had my first caketastrophy! I was able to save it and it turn out pretty good, but it was quite a stressful lesson. http://cakecentral.com/cake-decorating-ftopict-744834.html
Jessica, you are the best!!! I’m so glad that I’m not the only one that runs into that kind of ‘stuff’ (mishaps) LOL — I saw your cake in Cake Central and quickly added it to my favs!!! and I know what you mean about Swiss Meringue vs ganache…nothing (absolutely nothing!!) compares to ganache and yes it’s expensive but well worth it!!!
Thank you for sharing your adventures with us Jessica. God bless you!
Rosie
Seriously, your cakes have always been amazing, this is no exception, your little man must have been so proud of his mummy. Congratulations!
I love this cake! As always you did an amazing, neat, clean job. Thank you for sharing your tips for candy molds. I can totally see how this would be faster than trying to form vehicles from fondant/gumpaste. I will have to try it some time.
Great job, as usual! My little guy would love this! What do you use to dye your modeling chocolate?
Alicia: I rarely dye my modeling chocolate! I try to design around the color available or mix in white or colored fondant to get shade differences. If/when I do color them, I use the Wilton candy colors.
I’ve read somewhere (but haven’t tried it) that you can put the regular gel colors into the corn syrup and mix it up, then pour that into the melted chocolate and it colors it just fine without needing candy colors. Let me know if you ever try it! – and how it works!
I’m going to attempt modeling chocolate roses this weekend, but I think I’ll also use what’s available in the Wilton colors. It’s for my Gram’s 90th birthday party, so I’m not going to experiment this time! Thanks for the response!
P.S. So you combine modeling chocolate with fondant?! Does it make it more pliable? Thanks so much for your patience.
Your work is perfect, my dear friend. I wish I had the chance to be taught by you…
Such a fun cake! I believe that chocolate molds are made so that the set chocolate will pop out without you having to spray them with anything. I have done lots of molded candies with both real chocolate and candy melts and have never sprayed any molds. I’ve never had a problem. But I think the trick also is to not wash them with soap. Sounds strange, I know, but you just wash them with really hot water. This will help them keep their non-stick properties. If they do stick, you can pop it in the freezer for a few minutes and try again. I hope this helps with any of your future candy-making!
Kristen: Thank so much for the tips!!
Wow! I really love this cake!
That’s really a nice-looking construction birthday cake!
So beautiful!
You are so stinkin’ talented!!!
I love this cake! We’re doing a construction theme for my son’s 3rd birthday in a couple months. I need to learn how to work with modeling chocolate, I plan on doing a cone topper like you have done. But I’ve never worked with modeling chocolate before to cover cereal treats. Maybe I’d have more luck with it than fondant! Where do you purchase your modeling chocolate? Also, for the clouds – did you use scalloped cookie cutters? They look so nice and symmetrical!
Thank you!
If you click on the link below and follow it down to modeling chocolate…there’s a few recipes. You can buy it, but it’s spendy! Best to use the orange melts at Joann’s or Micheal’s.
http://jessicakesblog.blogspot.com/2011/05/most-commonly-asked-questions.html
Thank you so much for the info! I just got the mold in the mail the other day, I hope I have as much luck as you did with using it, yours turned out so great! How did you get the white wheel wells in the dump truck – did you use white candy melts before pouring black candy melts into the mold? Thanks again! You do AMAZING work. I am so blessed to have found your blog. You seem like such a genuine person, which I find so refreshing and happy!
Thank you!
The wheel wells are fondant I applied after I took the chocolate out of the mold. I painted it with a bit of silver luster dust. You can add fondant to the chocolate to bring more detail out. Just use a little melted chocolate or a little tiny bit of water.
I love this cake more than words can say. My boyfriend owns a construction rental company and I think I may have to make a variation of this cake for him. I just love it!
Question — I’ve looked all over your blog with the hopes of not asking a question you may have already answered and couldn’t find the answer. On this cake, what did you use to make the mountains and sun? Is it fondant, gum paste or modeling chocolate? All your cakes, especially your hot air ball0on cake, the cutouts that you use to adorn your cakes are just so perfectly cut and clean. How do you get them so perfect?
I have been using fondant and gum paste and no matter how sharp my Exacto knife is, they never look as beautifully crisp as yours.
Your talent is simply amazing. I hope to be as good as you someday! I’m SO glad I found your blog!!
Julia
Thanks Julia!
The cloud and landscape is fondant. I roll it pretty thin, then let it sit just a bit so it’s not SUPER soft. Then, using a sharp knife, I cut it. I also use flower cutters for the clouds and a pizza cutter for the rolling hills.
I mainly always use modeling chocolate…most the decor on the cakes hon my blog are using modeling chocolate. If you make a batch and use it, you’ll see that it hardly stretches at all and cuts amazingly clean!
Blessings!
Thank you so much for replying! I’m going to give your tips a try.
Jessica, you do such amazing work!!! I have learnt so much from following your blog and your craftsy classes… Thank you seriously for helping make my work clean.
I planned a construction themed party for my son’s second birthday!!! I just couldn’t think of what kind of cake i wanted and i absolutely love this cake you made…. i should have messaged earlier to take your permission; i ended up almost replicating the bottom tier and made a replica truck (his favorite) in your mud cake recipe – I hope you don’t mind?but thank you for both your recipe and ideas
Absolutely!!! I hope he had a fantastic party!!!!
Thanks a lot !!!!
I have to show you the picture somehow
Where did you get your sun and flower/cloud cookie cutters? Thanks!!!
Hi there!
I used the 6-petal flower cutter from this set (http://goo.gl/AIeUwj) and cut it in half for the clouds. Then, for the sun, I just hand cut out the triangles and stuck them behind a circle of modeling chocolate I cut out with a 1″ cutter. Super simple. I hope that helps!
Okay, one more question I am making the homemade modeling chocolate but of course it “seizes” and needs to cure. So how to use that in these molds since it’s obviously not pourable? Thank you!!