Happy Birthday to my sweet sweet friend Alyssa!!!

You are SUCH a joy to me and I have treasured our friendship over these past years!! I pray immense blessings upon your life and the lives of your sweet girls and wonderful husband! You are such a light, have such a generous heart, love the Lord with all your soul and desire to bless those around you! Thank you for being in my life, for your sweet smiling face and your “squishy” hugs! Thank you for blessing me in so many ways!! I am so lucky to know you!

Alyssa and I just returned from a Mom’s Heart Conference in southern California last weekend! It was an AMAZING experience and I look forward to sharing more with you in posts down the road. I’m learning SO much about the plans the Lord has for family and how IMMENSELY important my role as a mom is in the lives of my sweet kiddos! I have not had the joy I should in caring for my kids!! They are these amazing gifts from Heaven and I get to influence their lives forever! I get to inspire them to live lives of excellence and share with them the love of Christ! – what a calling…what a responsibility! – and what a JOY it is when I do it with my whole heart!! Thank you Sally Clarkson for the conference and for all the wonderful speakers! I was challenged and feel refreshed and recharged with a beautiful vision for what God has called me to be…
a whole-hearted mom!

So, what does all that have to do with this beautiful buttercream frills/ruffle cake???
Well, I’m not sure! – I just am sooo happy right now and because my sweet friend Alyssa was with me, I had to mention it because this is her b-day cake after all! Although…it sorta turned out looking like a wedding cake!! LOL!! Oh well…it’s the heart that matters! I wanted her to have a b-day cake tonight for her big family dinner…and because I’m trying to do my best at being a whole-hearted mama and spending lots of time loving on my kids…I can’t make a big ol’ fondant cake! :) But, I wanted it to still be beautiful, like my friend, and I’ve been wanting to try doing buttercream frills because I knew it’d be SO much faster than fondant frills!! – and it WAS!!! I LOVE the look of it and I was able to do the actual ruffle part in less than 45 min! WAY faster than fondant!

See…it looks like a wedding cake! – sorry Alyssa! :) But, it still is pretty and feminine just like you!
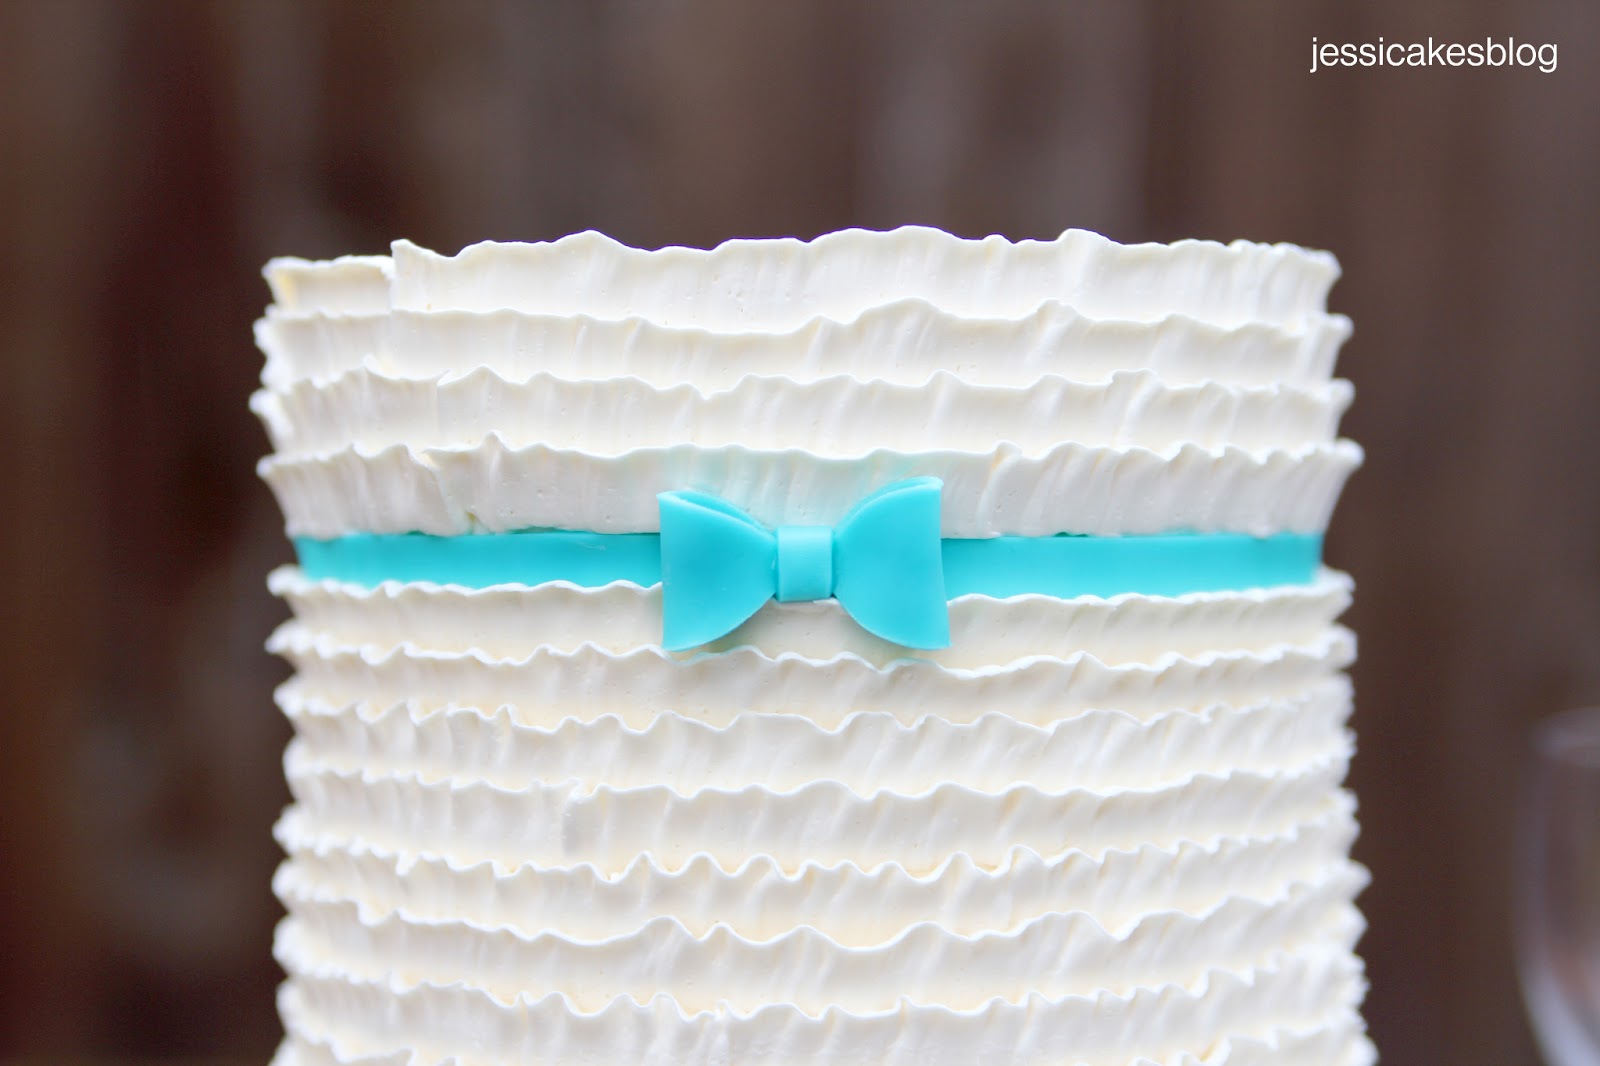
How SWEET are these ruffles!! I love how it turned out!! – and so did my daughter! She was hovering in the kitchen watching me do this and kept saying, “Mom, I love it!” – and so she became my photographer in the how-to pics!! I couldn’t hold the piping bag, turn the table and take pics…and she was so excited to help! So, the following how-to pictures are brought to you by my sweet 7 year old!!
Thanks Raquelle!! Mama loves you!!

In order to pull off this design, you need a petal tip! I used this one…the Ateco #104. Wilton also makes one just like it. Now that I’ve used this smaller one, I’d love to play with a larger one! I’ll have to go shopping! I also used Swiss-meringue butttercream for that beautiful piped creamy yummy goodness! :) This is a 6″ round cake with 6 layers of cake and 5 layers of filling. I used about 30oz of buttercream frosting in case you wanted to know! :) You’d want to make more to have enough for scraping and smoothing, but that was how much mine weighed out to be exactly.

I crumb coated the cake using the upside down frosting technique. I’m so excited because I show you how to do this in my upcoming video! – should be out the end of February! – stay tuned.
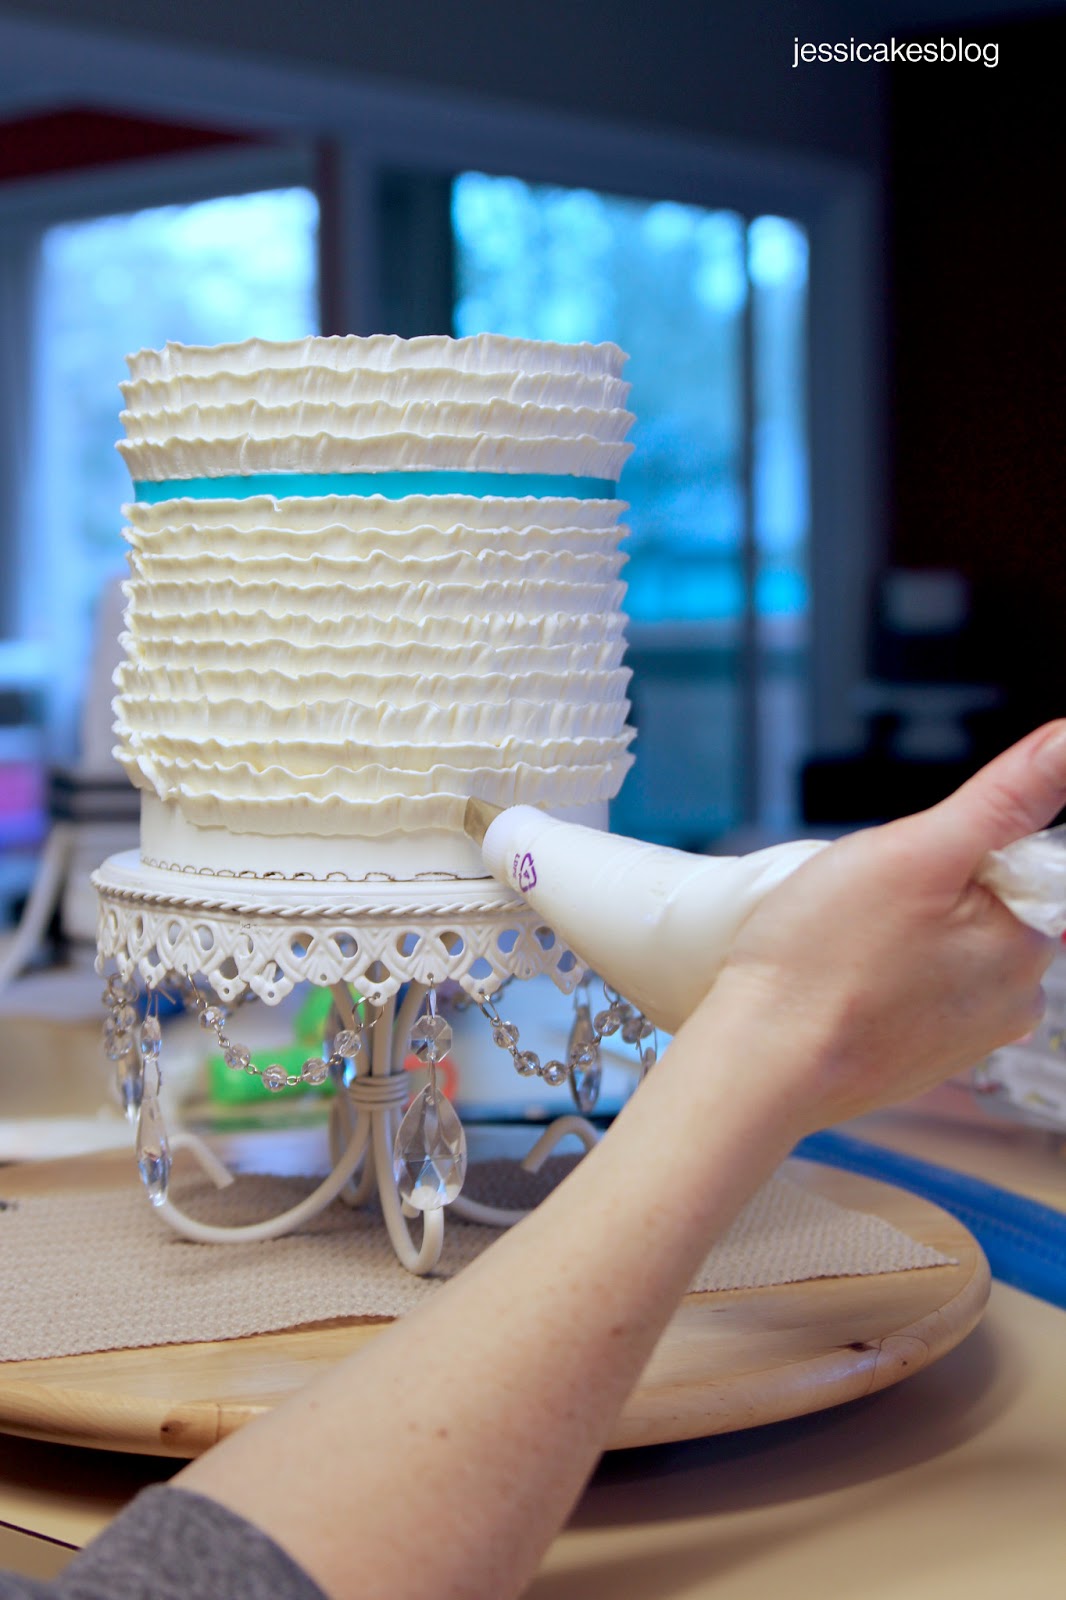
Once you crumb coat the cake, I chilled it so that it was nice and firm. Notice I didn’t spend much time filling in any little air bubbles or making the crumb coat perfect because it’s all going to be covered by ruffles. Just make sure the top is nice and smooth if possible.
Start your tip at the top, keeping the fat part of the tip pointed down and slightly against the cake and the skinny part point up and away from the cake…that will be the ruffle part. Now, I don’t have the steadiest hand, which is actually great! The more you wiggle, the better your ruffles look! So, don’t worry about it. I supported my right elbow/arm on the counter and rotated the turn table keeping my right hand steady thereby creating a pretty level line. Then, move the tip down so it’s half way between the line above and start another row. Keep going all the way to the bottom.

I added a little pearl border at the bottom to cover up some of the full ruffle. It needed a little something down there!

Now, if you want to add a little bow, all I did was stop after the fourth row of buttercream, added a fondant band and continued with the piping. Super simple! – and gives you a splash of color…especially on a taller cake. I would have loved to have created some beautiful flowers for this cake, but alas…I’m busy being a whole-hearted mom! – well…trying…between buttercream ruffles – got to love nap time! hehe

Now, if you need a “quick” and beautiful cake for a friend…you can try this one! Happy ruffling with your buttercream!
Hugs to all my sweet blogger friends out there! Now, go hug your kids!!!
It’s beautiful! Thank you for the great tutorial!
I absolutely love this. Although I love fondant for wedding cakes, I agree that for birthday cakes buttercream is just so much faster. With this ruffle pattern I couldn’t even tell if it was fondant or buttercream. So pretty!
Thank you for the tutorial
Wow, its my birthday next and I think I’ll be making this for myself, yep who makes our birthday cakes?!
Gorgeous!
This is lovely!
Beautiful! Now I need to find a reason to make a cake thank you for the tutorial.
Es preciosa!!
Raquelle! You ROCKED the camera!! :0) I guess I have some competition, huh? We’d better watch out, Jess–Kendra has been getting comfy behind the camera lately, too… ha ha! Love you both!!
Thank you so much for sharing this. I work full time and have two kids plus a husband plus parents that lives with me so my hands are pretty full. And, I wanted to be able to make cakes that doesn’t take up so much of my time..and this is perfect! Thank you!
God bless you and your family.
Jessica, it is gorgeous, just like all of your work. Thank you for so much lovely inspiration!
This is gorgeous! What buttercream did you use? The recipe that you spoke of in the previous post? I adore the turquoise bow!
Jen: Thank you! I used my Swiss-meringue buttercream…recipe is under the “most commonly asked questions” link at the top right of my blog!
Thank you! I have enjoyed discovering your blog…thanks to remodelaholic. I have spent WAY too much time drooling over your creations! Thank you for sharing!
Love, love, love ruffle cakes right now! I didn’t think to do it in buttercream though, and I agree with you that it would take half the time. Have you ever tried Italian Meringue buttercream? If so what do you like about the swiss better?
I used to make IMBC all the time but accidentally burnt myself with the sugar syrup one time and almost got one of my kids with it too! – so, I just switched to SMBC because it’s a little easier to make and no worries about burning!
I’m kinda crazy in the kitchen! – and slightly accident prone! LOL!
That is a good reason. I have 3 little ones and understand with the hot syrup. I recently made both and was comparing the 2. Other than a slight taste and cooking method, it seems to me they are almost identical.
Yes…I couldn’t tell a difference in taste and they both perform the same which is super important to me too! So, SMBC it is!
Squeeze those little ones before they get too big!
This is a gorgeous cake Jessica!!
This type of design is so trendy right now in ombre but boy is it tedious to do with fondant or modeling chocolate. I never thought to do it with piped buttercream. Right on! Thanks for the inspiring tutorial.
Exactly! I love the look too, but I just don’t have the time to do it with fondant/modeling chocolate. I’ve been thinking about doing this for a while, so I was excited it worked out so good!!
It’d be easy to do this ombre too…just have your 3-6 colors ready to go in piping bags and pipe away a few rows at a time! Would be really pretty!
This could not be more timely!! I was looking for a buttercream version of the ruffles for my daughter’s upcoming birthday. THANK YOU!!
Big thank you for the tutorial Jessica. I love following your blog. Every week I’ve been waiting to see what other ideas of your pop up lol Will attempt to make this for my girlfriend’s birthday next week. x
Had you not posted those “up close” pictures, I NEVER would have noticed those ruffles to be made out of buttercream. That is FANTASTIC. Thx for the tutorial. Off to hug my kids now
Carm
Very beautiful and elegant, congratulations!!
It’s beautiful! Thank you for the great tutorial!
Heidi from Germany
Such a gorgeous cake! I have a question for you–is it possible to do these ruffles with stabilised whipped cream rather than SMBC? I am going to make an informal wedding cake for a friend, but she wants whipped cream as frosting. It would be nice not to have to forego a fancy piping technique…
Thanks so much in advance!
I have no idea, but I would think that it could work. The best thing would be to make a small batch and use a dummy cake round to try it out before you commit! Has your friend ever tried SMBC? It has a VERY light, almost whipped cream type flavor!!! – she might love it!
Thanks so much for your reply! I don’t have a dummy cake round, but I suppose I could be forced to bake a small cake to try it out… I will certainly keep you posted as to how it works (and how long it holds up; also important…)
Looking forward to seeing your video when it’s finished! Thanks again!!
Yes, I’d love to know how it worked out! You can also use the side of a box or a cake pan…anything that you can pipe vertically on! – to help save you the calories!
Jessica, my buttercream turned out to be more towards yellow in color instead of white. What didn’t i do right? Thanks. Love your work.
Maureen xo
Mine is never white…always an off-white because of the butter. There is a difference in the color of butters!!! I buy mine at Albertson’s if I want a “whiter” butter. The cheaper brands are very yellow…so, you’ll get a more yellow buttercream. One way you can help get it more yellow is to whip your butter before you add it to your meringue…it will lighten as you whip. If it’s still “yellow”, then you’ll want to add some white coloring…preferably candy colors because of the high ratio of fat in the buttercream. If you don’t use candy colors, there’s a good chance the color will bead up and look a bit streaky because it can’t find sugar crystals…you’ve melted them so all you have is fat. That’s why it’s best to use white candy colors. If you can’t find white candy colors but you have the Wilton White Icing color, then you can use Flo-coat to help the Icing color blend into the buttercream…
http://www.bakedeco.com/detail.asp?id=12483#.UR2o6WdZ2So
I hope that helps!!
Its beautiful did u color you SMB oru use a 50 50 crisco or shortening? I am afraid color chanche the yummy flavor
I didn’t color the buttercream. I found a line of butter that comes really light…not very yellow. So, it gives me a lighter/whiter SMBC!! Thanks!
CONGRATULATIONS ON YOUR CRAFTSY CLASS
I am goin to buy the class I am waiting for my husband to forget I recently get 2 did you mine share the brand of buter? Is it Altons brand? Thank you an again congrats this is so excited
Yeah! It’s 50% off at the link at the top right of my blog, so it’s only $20 here on my blog!! Hopefully that’ll help!
For this whiter butter, I bought it at Albertson’s. It’s a local grocery store’s brand. I’m sorry if you don’t have an Albertson’s by you.
Hi Jessica,
I just found your blog yesterday! Beautiful creations Doll!
What consistency was your buttercream for the ruffles?
Yeah! Glad you found me!
It’s a classic Swiss-meringue buttercream. It’s like a whipped cream type consistancy…maybe a little thicker.
Awesome Blog! found you on Craftsy. Your work is Beautiful! I thought the Butter cream ruffle cake was fondant!! It’s flawless. I can’t wait to take the class.
Beautiful cake. Thanks for the tutorial. Kathy
Hi Jessica! I saw this last week and was wondering when I can actually try it..lo and behold, I got a call from my most regular customer who wanted to order her own bay cake for this weekend. I immediately thought of trying this out!!! Good excuse eh?
I know SMBC is a stable bc but I was wondering if in my hot and humid weather, whether the ruffles will remain standing like that? Do I need to refrigerate cakes with SMBC?
So fun! SMBC can start to melt over 85 degrees…melt as in just get real soft. The ruffles here are so small that it would have to be warm for a while to see any sliding. So, it’s your call…not sure how “warm/humid” your area is! That being said, you can do a 50/50 ratio of hi-ratio shortening to butter in the SMBC and that will really help with stability because the shortening has a high melting point. Just add a little more flavorings to compensate. I would think you’d be good to go unless it’s sitting out in 90 degree heat for a long period of time.
You can always refrigerate and tell her to let it sit out at room temp an hour or two before she eats it.
Was the blue band fondant or modelling choc? I supposed you just attached it directly to the bc without the wax paper transfer right? just checking to be sure…hehehehe
It was fondant…and tough to put on because it kept wanting to bend/stretch! I didn’t use the wax paper because I was afraid I would damage the ruffles already on there!
Jessica, I love your blog! I think your cakes are beautiful and inspire me to try so many new things. I especially like you commitment to your faith, and your willingness to share it. I just bought your Craftsy class and I can”t wait to try it out…
Yeah! Thank you! God has blessed me with His love and grace!! – I can’t help but share that!! May He bless you too!
Thank you
Muy bonito giracias.
Hi there do you know the Wilton equilivant to the Ateco 104?
Thank you
Which Wilton tip is the ateco 104?
It’s a rose petal tip…I’m not sure the cross over to Wilton! I’m sorry!!
This has been a weekend of firsts for me! I made SMBC for the first (and second) time, used your upside-down technique to ice (I have your Craftsy class), and did this very ruffle technique using the Wilton 127 tip. Nice and big, only 8 rows on a 4.5inch tier, but the ruffle edges are not nice and crisp like yours.
I’ll be trying ruffles again soon in fondant. A friend wants a ruffle wedding cake for June, so I am starting early on the learning!
There is a lot of frosting on this cake! I was so excited to try the upside down technique that there is a full final coat, then the ruffles. Next time, light crumb coat only on the sides!!
What’s the name of your Crafsy video on ombre ruffles?
If you click the tab at the very top called “My Craftsy Classes” you’ll find a link to my newest class “Clean and Simple Birthday Cakes” where I show how to do ombré waves. Then further down is Maggie Austin’s class on fondant frills/ruffles with a different ombré technique. Blessings!
Hi Jessica, inspired by your story and thank you for your tutorial – I know your an inspiration to keep moving and GOD will provide direction in my life and what is in our heart.
Thank you so much!! God bless you!!
Thanks for the great information. Very cute! Can you tell me where I can get that wonderful cake stand?
Thank you! I got it from Home Goods and spray painted it white!
do you think this cud work with a cream cheese frosting?
It could if your ruffles weren’t too big and you kept it in a cool place. But it’s not very stable so I would probably use plain on the outside unless you have a cool environment. Best wishes!!
Gracias esta bello
Espero y me quede así de bello
I echo everyone else… Simply amazing!!
With a cake this size and with 6 layers… Do you stabilize the cake in anyway? Do you put a dowel rod down the center?
I’ve always wondered on this part.
Thank you!!!
Yes…you want to build up half the cake layers (about 3″) then place bubble straws and a board that’s cut a bit smaller than your base board, then stack and fill remaining layers. Crumb coat it all together. I show how to do this in my “Simply Modern Cake Design” class. 50% off links are on the sidebar. Blessings!!
Wonderful! Thanks for share! I have all your craftsy lessons….
Hi Jessica, beautiful cake! Wish I’ve seen this before, my birthday cake could have been better. I only discovered your blog today in Pinterest, thank God! Does the SMBC you used for this cake good for piping roses too? Thank you.
By the way, everybody’s talking about craftsy classes, I think I’m too late in the game, I don’t even know how to do it, can you give me a tip on what to do if I want to join a class and learn. Thanks.
Yay! Glad you found me!
Swiss meringue is awesome for piping!!! And tastes fabulous! My recipe is under the cake resource tab at the top of my blog.
Craftsy is an incredible platform. All of my classes are listed on the side bar of my blog, so if you click on any of those classes you’ll be taken to Craftsy’s site with a 50% off code. When you buy a class, you own it for life and can watch it as many times as you like. Enjoy!!
This is so beautiful! How would you store a cake like that? I haven’t been able to find a cake carrier taller than 5″… Thank you so much!
Thank you! I just keep it in the fridge until delivery…uncovered. Although you could put it in a big box if you wanted to keep it sealed from fridge smells.
Jessica do you think that tip 104 would create a bark like affect for a tree stump cake? I don’t want to do the bark with fondant so as I was looking at the Ruffles I started wondering “could that possibly work to give a bark like affect”? Going up and down instead of around.
I’m sure there are a few tips you can use and overlay to get that type of effect. It’s worth playing with! – it would save a ton of time!! You can even use ganache!