
I’ve been wanting to try my hand at a book cake for a while now and I finally had the perfect opportunity to do it!!! My sweet daughter turned 8 years old the week before last. She is a BIG reader, so we decided to do a storybook theme’d birthday party this past weekend!! It was perfect!! All her darling little friends came over and they each wrote a chapter of a story that we put together and read at the end! It was all about a princess who trains a dragon. It was soo sweet and now she has a little storybook keepsake with chapters in it from all her friends! Love it!
I’ll post pictures of the final cake on another post. This one is just about how to make a book cake…an open book cake that is. I hope this helps you all when you want to make one. I had a great time and thought it turned out beautiful. I did have a few lessons learned which I’ll share towards the end.
Off we go!

I wanted the base of this cake to look like a book…meaning, I wanted it to sit up off the board a bit like a lot of books do. I found a book in our collection (our much loved concordance) that was about the size I wanted for the cake. And, if you notice in the picture above, you’ll see how it sits off the table where the base/binding is. That’s what I wanted!

I decided to build the base of the cake out of foam core. It’s what I had lying around and I can buy it at the Dollar Store!! So, it’s a very economical way to build a base for a cake. I cut the sides to be 8″ x 8″, I cut the spine to be 8″ x 2″ and stacked three of them together, and then I cut little “rib” supports to help keep the sides up off the table. You could add a few more if you wanted, just make sure to not put them too close to the edges or you’ll see them.
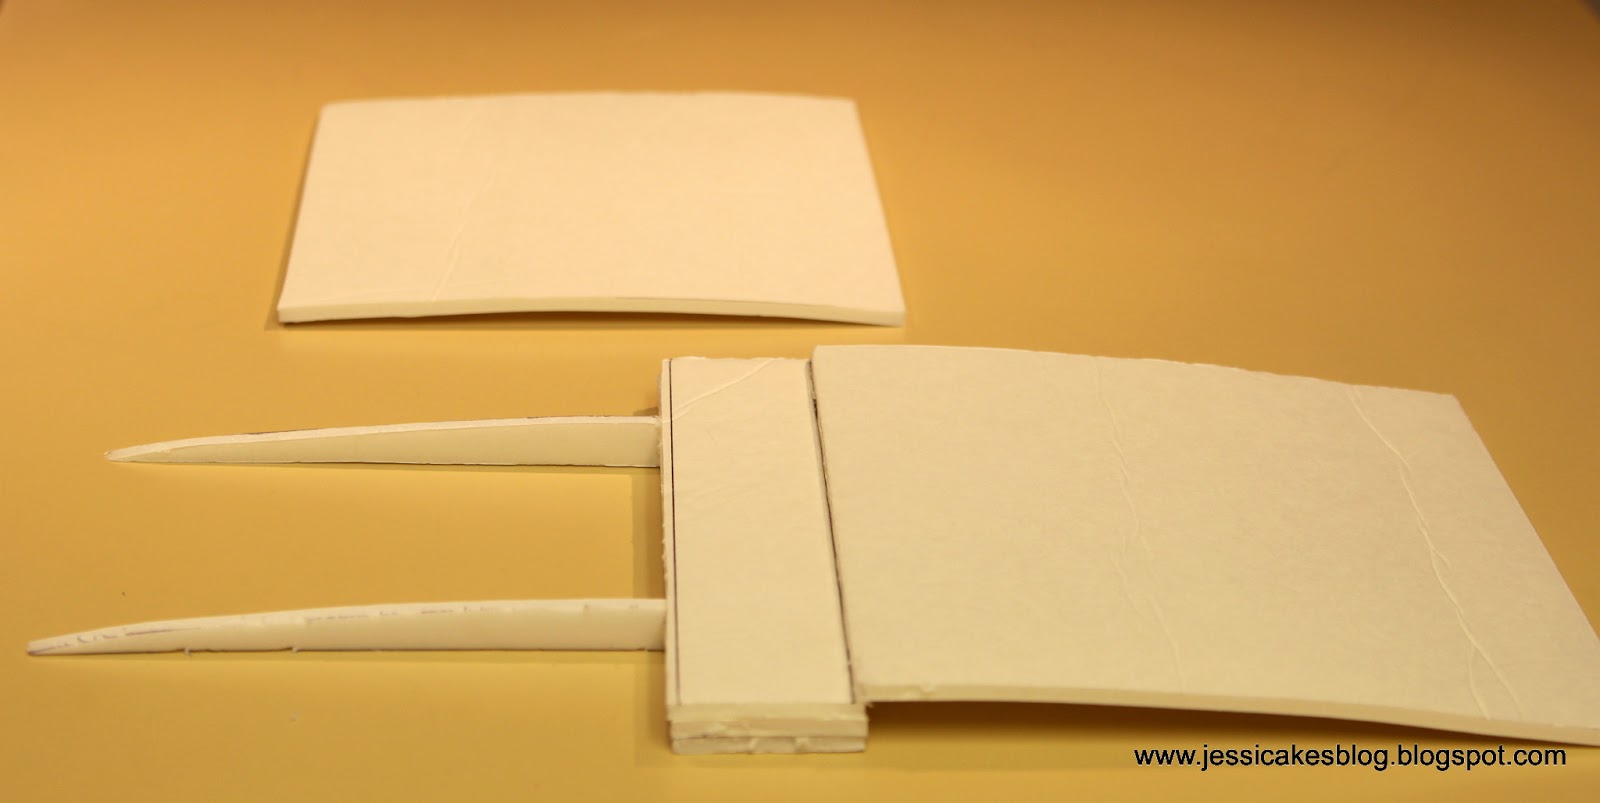
I drew a line down the spine recessed in from the edge about 1/4″. That was my guide line when I glued the sides onto the spine…so, they’d go on straight.

I hot glue-gunned everything together.

Here’s the completed base.

Next, I built a template for how I wanted the pages to look. Again, I grabbed my concordance and put it up against some foam core sitting flat on the table. I traced the pages onto the foam core to give me a template.


I cut out the template…above…and realized it was a little too short for me. I wanted more height. So, I added another 1/4″ to the base of the template and cut out a new one…below. Notice it’s a bit taller. You could go taller than that, but I wanted it to look realistic and the binding size couldn’t hold too many more “pages”!


I cut another template exactly like it so I had two and could look at it together from a few angles to make sure I liked the scale/size.


Next, I added a little filling to the board and stacked my cake. I baked this cake in a half sheet pan and torted the thin layer in half so I could put a little filling in there. I love filling and will try and torte a layer of cake if I possibly can! :) I cut a few strips of cake to fill in the binding area.

Make sure to leave at least 1/4″ gap all around the board so you have a place to add frosting in order to create a crumb coat.


Place your templates and begin using them to carve down the cake or to add frosting where you are a little low. I had to add a little frosting at the larger hump towards the center and a little at the edge before the pages mitered down.

You can see the right side has been carved and the left side has been crumb coated and filled a bit.


Crumb coat out to the base board. Don’t worry about getting it super smooth at this point. You’ll want to chill it so you can scrape it and get it nice and smooth after it sets up a bit.


The picture above shows the final crumb coat after I chilled it and scraped it a bit with a flexible scraper. I seran wrapped a few books in order to get the cake off the table so when I covered it in fondant I could trim the bottom edges nice and evenly.

Above: After covering in fondant, I added the page creases with this thin metal ruler and went over the sides with a paper creasing tool that looked like a plastic knife so I could get the paper creases curved like the pages of a book are.
After you add all the pages, you can cut another piece of THIN fondant (mine was around 8″x8″) and add it to the top to create a real piece of paper with folded edges…see pictures towards the bottom.
Now, I would stop at this point if you’re going to paint the edges of the book or “distress” them…BEFORE you put on the binding. I put the binding on first, then when I was adding the powders to create an aged look on the book, it got all over the binding and was really hard to get off. So, before you put on the “cover” or edge of the book, paint…then, when you’re ALL done, then proceed here…and add your edge bands.

For the edging I rolled out some brown modeling chocolate around 3/16″ thick and cut 10″ bands. I added some sugar glue to the base of the cake and to the modeling chocolate and began lining it up right at the bottom. I mitered the corners of the book at a 45 degree so it was a clean edge…below.


Above: In order to get this worn look, I used some mocha and cappuchino petal dusts (non luster) and dusted the edges of the book. I then took a damp napkin and rubbed that color out a bit to create more lines and even out the variation a bit. It worked great! However…If you look at the pic above, right where the pages meet the spine there is a little white spot from the foam core base. You’ll want to paint that to match the binding, or “lesson learned”, cover it with binding material (fondant or modeling chocolate) before you start adding the edges. Since my edges were dark brown, I just painted it with more brown gel and it totally disappeared.
Now, a huge bummer for me on this cake…
I realized after the first swipe of petal dust (which happens to be too late to change your mind when working with fondant) that I should NOT have distressed the book. For the past couple weeks, when I had decided I was going to do an open book, I had visions of “distressing” the edges to look worn even though I had no idea how I would decorate the pages of the book…so, that was engrained in my mind I think. Then, the day before I made the cake book, my daughter and I finally decided we’d make it a pop-up storybook and she could create all the pop-up art for the book since she loves to color and this would be a perfect combo of her loves…books and her artwork!!
At midnight (when my mommy mind is totally gone and I’m working in auto-mode), when I added the first touch of color to the pages, I came out of my “coma” and realized the cut outs she had made and colored that day, that would be sitting on the book, were too bright, cheery and “clean” for an old distressed book (you’ll see on the next post when I show you the finished cake…there is a disconnect between the book and the contents of the book). I was so worried my daughter would get up the next morning and be upset that the book looked so worn/old compared to her artwork/decorations. For some reason I had never told her I was going to do that. At midnight, when I finished distressing it, my poor husband had to listen to me for 30 minutes saying, “Man! What was I thinking?! This is terrible!! This isn’t going to look good! I should have left it white! Ahhh!!”
But, the next morning, she was SO sweet and said, “Mom, fairy tale books are old, so it makes sense that it would be old and dirty looking!” How sweet is she!? – Wow I am SO blessed to be her mom! I think she knew I was upset about it and she was just making me feel better! Who’s the grown up now?! LOL!
Note to self…when doing anything past 11pm, stop and think…and think some more! – especially if it’s adding color to fondant!!
Here’s my angel painting! My precious girl!!

The cake board is a 1/2″ sheet of particle board that was left over from a cabinet project. It was the perfect size!! So, my daughter and I rolled out some fondant and cut it into 2″ wide strips and laid them in a random pattern on the board. My daughter helped me paint the fondant to give it a wood grain look She LOVES to color and paint and it’s real hard to mess up wood grain, so I handed her the paint brush and a bowl with some brown gel and vodka in it and said, “Go to town!” Here she is painting her cake board. It’s really easy…you just paint with the grain back and forth, back and forth layering more and more color until you get the look you want.
Don’t mind the “hole” in the center (above). I ran out of strips of fondant and decided to be lazy and not put anymore on there since the book would cover it anyway. Later on I realized you could still see the hole under the book, so I ended up rolling out more fondant, cutting it, placing it and then painting it to hide the hole. Being lazy NEVER ends up a blessing! – only a curse! :) When am I going to learn that!?
I LOVED having her help me with this cake…and she had such a ball participating in her own birthday cake! This was the first time…believe it or not! This cake was ALL about her…so, it’s a fun memory for us both! I can’t wait to see what we’ll do together down the road! I have my own assistant now!

I got ahead of myself and started placing the items on the cake before taking a final larger picture…so, here it is…but with one of the pop-ups fuzzed out. She designed the top cake to the left. She wanted it to be turquoise fondant with ruffles like my pink/black ruffle cake I made for my Craftsy class. So, that was included on the board to give it a birthday feel.
Stay tuned for another post with pictures of my little artist and the final cake!!
Thanks for looking!
Thanks so much for this tutorial. Just in time as I am about to attempt an open book cake for my nephew’s confirmation in 2 weeks.
I will be sure and post a picture to show you mine.
Thanks so much again
Very detailed and helpful! Thank you!
Love this post Jessica, thank you very much!
WOW! What a wonderful cake for a beautiful girl!
Fantastic! Thanks for sharing!!!!
Amazing job as always! Thank you not only for the tutorial (which I love), but also for sharing a little about your idea for a book themed party. Perfect for a book lover!
Cant wait to see the final cake!
This comment has been removed by the author.
Oops! Not sure what happened, but did not mean to delete my comment…
Great tutorial! Look forward to seeing the finished cake!
Thanks so much for the tutorial! I can’t imagine how much time it takes you to put these together! They are always so wonderful! Keep up the good work!
Wow! What an amazing cake! Congratulations! Thank you for sharing! Kind regards, Jo – Numbers 6:24-25.
You are amazing and it looks like your daughter is following in your footsteps.
This is fantastic! Thank you so much for posting! I need to do one for next weekend and this tutorial is such a huge help!!
That is so amazing. I wanted to make a book cake a while back; I visualized something that looked like this and then chickened out when it came to making the curved pages. I went for a much simpler closed book instead. This makes me want to try it again.
http://flourarrangements.org/2011/06/eating-your-words/
Amazing! I have done two open books cakes for a Holy communion and a baptism and I gotta tell you that it didn’t turn out anything like yours :). Thanks for taking the time to share your ideas with us. Can’t wait to see the finished product.
I did an open book cake recently, and I sure wish I could have read this post first! It turned out good, but not as awesome as yours! Mine was for a Harry Potter theme, and I dyed my fondant a very pale brown and left some marbelization in there to make it look like old parchment.
Great idea about the color!
Simply incredible!! Happy birthday sweet Miss R. Love you guys!
This cake is absolutely incredible! And I just love the entire book theme for a children’s party. Kudos to Mom!!!
You are great!
This looks very technical, thanks for showing us how to do it. I would love to take your craftsy class.
I need to find someone to make a cake book for! Thank you for the turorial.
Your tutorials are great. Thanks for the inspiration of not only the cake, but letting the birthday girl be a part of it. I can’t wait to see the finished cake. I did something similar last year when my daughter wanted a sleepover cake. She helped design it, and after I cut out fondant “girl” shapes, she used edible markers to make her friends. It came out great, but my favorite part was the time we spent on it.
Awsome tutorial. How many servings does this yield?
This tutorial is really good we can eassly make this cake.
Is their any service to order cake online
This is really a great creative work. The idea is awesome. I am a big fan of cakes, first time i had seen such an innovative and different cake. Thanks for shearing this blog.
WOW! the book looks so real. Thank you for sharing once again your brilliance!
Hi Jessica, Love your tutorial!! you are awesome!! thanks for sharing with us!!
This is very nice tutorial. However I am not in this field. I never carved a cake before. Do you have this tutorial in video?
its my best friends birthday in a month and this is exactly what I was looking for, I will post a picture when Im done. also Im a little nervous never done a cake tis complicated before
Such a cool cake!! love it!
beautiful cake !! I like it
Wow looks amazing.ive seen alot of open book cakes but yours is really awesome.im going to make one this sunday for my pastors BDAY. Ill show a pic once its done…
Wow! Open book cake.. That sounds great and even looks awesome. Thanks for sharing..
cake online
did you ever post finished pics of the cake? I would love to see the images your daughter created!
Thank u for this, not sure how old it is, but it’s come in very handy for an order I’ve just received! Thanks a stack
How did you get the foam core to curve when you made the base for your cake. (the second picture)?
I actually didn’t get it to curve…I cut it out like that to have a curve in it. I hope that makes sense. I drew it in that shape, then cut it out of the foam core. Blessings!
Amazing. Thank you!! Where did you get your paper creasing tool?
Thank you!
The tool I used to make the creases was just a metal ruler. You can use any sharp straight edge…even a knife. Have fun!
Thanks for the tutorial, Jessica! I just used it and the cake turned out great!!
Hi there Jessica..I was just browsing through the internet to get some ideas on a design for a 70th b/day cake for my namesake who will be turning 70 on 31st May.I just happen to come across your page..my namesake is a very religous lady,and i wanted to bake a bible shaped cake for her but do not know how it is done.Your step by step tutorial will be of great help to me as I will attempt this cake in the coming week.I really appreciate and thank you from the bottom of my heart..thank you for sharing your God given talent..God Bless.
Yay! Thanks for posting a comment! – and so happy you found me! May the Lord bless the works of your hands!
Thank you for your wonderful tutorial. I have never tried to use fondant before so was a little nervous about it. I made my own open book cake not as detailed as yours but it turned out pretty great.
Jessica thank you SO much for your fabulous tutorial.. it looks amazing. I have an order for an open book cake and this tutorial will make the world of difference. It was so lovely to meet you in Louisiana and find the person behind the beautiful cakes to be just as beautiful. I am making this cake for a couples wedding and I was wondering if I could bother you to ask how many you think it would serve (I’ll do the rest of the serves in a cutting cake if need be). Thank you so much for sharing your knowledge and inspiring me!!
Oh sweet friend! – it was a pleasure to meet you too! I wish I could help, but I’m not sure. When I need to know that, I actually look up Wilton’s serving chart for birthday cakes or wedding cakes and look there…square, rectangle or round…they have them all! This one was pretty small, so I’d say at most 6. I hope that helps!
Wow this tutorial is amazing! Greetings from the Netherlands. Oh and is there a picure yet from the endresult? Lots of love, Nathasja Tepper
never did see the final picture of the open book cake.
Thanks! this was helpful in evolving our ideas. Our’s turned out great for a son who is an avid teenage reader.
Thank you so much you are my favourite cake artist
You are SO kind! Thank you!
Hi Jessica, I just saw this tutorial and it is awesomeee!! Thank you soooo much!!! but, I was trying to figure out how to cut the foamcore to curve/bend like you did for the base? also, did you cover the spine of the book at the time you covered the whole book?? I hope you see my message and thank you again, this is an awesome tutorial!!! also, did you ever posted pics of the finished product??
I’m sorry it’s taken forever to respond. I just barely bent the foam core…just along the side of my kitchen counter. I cut the angled pieces of foam core so when I hot glued the larger, flatter pieces on it would curve just a bit…but honestly it’s more straight than curved. You can cut the cake to look really curved, but the foam core stays pretty straight. I actually don’t have after pics of the cake! I’m so sorry!!
Hello Jessica, i am so happy to come across your post.. a great help indeed. I dont have petal dust and planning to paint instead (the cake is due in 2 days). I am not getting the final picture of your cake.. would like to see it.
You have made it look easy.. lets see hpw it goes for me ???
Thanks a ton !
This is wonderful. It has made my attempt easy. Thank you so much